省流
这篇文章以seatunnel 2.3.6版本,讲解了一个zeta引擎的一个任务是如何从提交到运行的全流程,希望通过这篇文档,对刚刚上手seatunnel的朋友提供一些帮助。
这篇文章将从
- seatunnel server端的初始化
- client端的任务提交流程
- server端的接收到任务的执行流程
三部分来记录下一个任务的整体流程
参考
集群拓扑
首先从整体了解下SeaTunnel的Zeta引擎架构, SeaTunnel是基于hazelcast来实现的分布式集群通信
在2.3.6版本之后, 集群中的节点可以被分配为master或worker节点, 从而将调度与执行分开, 避免master节点的负载过高从而出现问题。
并且2.3.6版本还添加了一个功能是, 可以对每个节点添加tag属性, 当提交任务时可以通过tag来选择任务将要运行的节点, 从而达到资源隔离的目的(2.3.6版本有问题,2.3.8版本中进行了修复,如果需要使用此功能请使用2.3.8版本)。
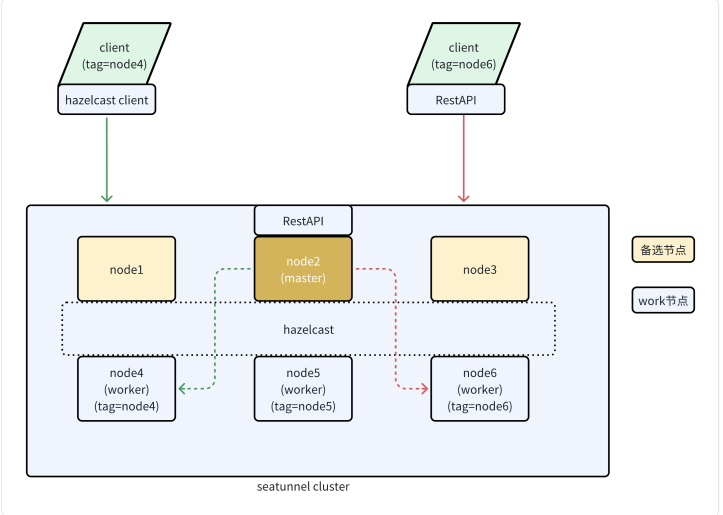
集群的服务端分为master和worker节点, master节点负责接收请求, 逻辑计划生成, 分配任务等(与之前的版本相比,会多了几个backup节点,但是对于集群稳定性来说是一个挺大的提升)。
而worker节点则只负责执行任务, 也就是数据的读取和写入。
提交任务时可以创建hazelcast的客户端连接集群来进行通信, 或者使用restapi来进行通信。
服务端启动
当我们对集群的整体架构有个大致的了解后, 我们再来具体了解下具体的流程
首先看下server端的启动过程。 server端的启动命令为:
sh bin/seatunnel-cluster.sh -d -r <node role type>
当我们查看这个脚本的内容后就会发现, 这个脚本最终的执行命令为:
1
|
java -cp seatunnel-starter.jar org.apache.seatunnel.core.starter.seatunnel.SeaTunnelServer <other_java_jvm_config_and_args>
|
我们查看这个starter.seatunnel.SeaTunnelServer的代码
 1
 2
 3
 4
 5
 6
 7
 8
 9
10
11
|
public class SeaTunnelServer {
    public static void main(String[] args) throws CommandException {
        ServerCommandArgs serverCommandArgs =
                CommandLineUtils.parse(
                        args,
                        new ServerCommandArgs(),
                        EngineType.SEATUNNEL.getStarterShellName(),
                        true);
        SeaTunnel.run(serverCommandArgs.buildCommand());
    }
}
|
这个代码是使用了JCommander来解析用户传递的参数并构建并运行Command, serverCommandArgs.buildCommand返回的类为:
 1
 2
 3
 4
 5
 6
 7
 8
 9
10
11
12
13
14
15
16
17
18
19
20
21
22
23
24
25
26
27
28
29
30
31
32
33
34
35
|
public class ServerExecuteCommand implements Command<ServerCommandArgs> {

    private final ServerCommandArgs serverCommandArgs;

    public ServerExecuteCommand(ServerCommandArgs serverCommandArgs) {
        this.serverCommandArgs = serverCommandArgs;
    }

    @Override
    public void execute() {
        SeaTunnelConfig seaTunnelConfig = ConfigProvider.locateAndGetSeaTunnelConfig();
        String clusterRole = this.serverCommandArgs.getClusterRole();
        if (StringUtils.isNotBlank(clusterRole)) {
            if (EngineConfig.ClusterRole.MASTER.toString().equalsIgnoreCase(clusterRole)) {
                seaTunnelConfig.getEngineConfig().setClusterRole(EngineConfig.ClusterRole.MASTER);
            } else if (EngineConfig.ClusterRole.WORKER.toString().equalsIgnoreCase(clusterRole)) {
                seaTunnelConfig.getEngineConfig().setClusterRole(EngineConfig.ClusterRole.WORKER);

                // in hazelcast lite node will not store IMap data.
                seaTunnelConfig.getHazelcastConfig().setLiteMember(true);
            } else {
                throw new SeaTunnelEngineException("Not supported cluster role: " + clusterRole);
            }
        } else {
            seaTunnelConfig
                    .getEngineConfig()
                    .setClusterRole(EngineConfig.ClusterRole.MASTER_AND_WORKER);
        }

        HazelcastInstanceFactory.newHazelcastInstance(
                seaTunnelConfig.getHazelcastConfig(),
                Thread.currentThread().getName(),
                new SeaTunnelNodeContext(seaTunnelConfig));
    }
}
|
在这里会根据配置的角色类型来修改配置信息。 当是worker节点时,将hazelcast节点的类型设置为lite member,在hazelcast中lite member是不进行数据存储的
然后会创建了一个hazelcast实例, 并且传递了SeaTunnelNodeContext实例以及读取并修改的配置信息
 1
 2
 3
 4
 5
 6
 7
 8
 9
10
11
12
13
14
15
16
17
18
19
20
21
22
23
24
25
26
27
28
29
30
31
32
33
34
35
36
37
38
39
40
41
42
|
public class SeaTunnelNodeContext extends DefaultNodeContext {

    private final SeaTunnelConfig seaTunnelConfig;

    public SeaTunnelNodeContext(@NonNull SeaTunnelConfig seaTunnelConfig) {
        this.seaTunnelConfig = seaTunnelConfig;
    }

    @Override
    public NodeExtension createNodeExtension(@NonNull Node node) {
        return new org.apache.seatunnel.engine.server.NodeExtension(node, seaTunnelConfig);
    }

    @Override
    public Joiner createJoiner(Node node) {
        JoinConfig join =
                getActiveMemberNetworkConfig(seaTunnelConfig.getHazelcastConfig()).getJoin();
        join.verify();

        if (node.shouldUseMulticastJoiner(join) && node.multicastService != null) {
            super.createJoiner(node);
        } else if (join.getTcpIpConfig().isEnabled()) {
            log.info("Using LiteNodeDropOutTcpIpJoiner TCP/IP discovery");
            return new LiteNodeDropOutTcpIpJoiner(node);
        } else if (node.getProperties().getBoolean(DISCOVERY_SPI_ENABLED)
                || isAnyAliasedConfigEnabled(join)
                || join.isAutoDetectionEnabled()) {
            super.createJoiner(node);
        }
        return null;
    }

    private static boolean isAnyAliasedConfigEnabled(JoinConfig join) {
        return !AliasedDiscoveryConfigUtils.createDiscoveryStrategyConfigs(join).isEmpty();
    }

    private boolean usePublicAddress(JoinConfig join, Node node) {
        return node.getProperties().getBoolean(DISCOVERY_SPI_PUBLIC_IP_ENABLED)
                || allUsePublicAddress(
                        AliasedDiscoveryConfigUtils.aliasedDiscoveryConfigsFrom(join));
    }
}
|
在SeaTunnelNodeContext中覆盖了createNodeExtension方法, 将使用engine.server.NodeExtension类, 这个类的代码为:
 1
 2
 3
 4
 5
 6
 7
 8
 9
10
11
12
13
14
15
16
17
18
19
20
21
22
23
24
25
26
27
28
29
30
31
32
33
34
35
36
37
38
39
40
41
42
43
44
45
46
47
48
49
50
51
52
53
54
55
|
public class NodeExtension extends DefaultNodeExtension {
    private final NodeExtensionCommon extCommon;

    public NodeExtension(@NonNull Node node, @NonNull SeaTunnelConfig seaTunnelConfig) {
        super(node);
        extCommon = new NodeExtensionCommon(node, new SeaTunnelServer(seaTunnelConfig));
    }

    @Override
    public void beforeStart() {
        // TODO Get Config from Node here
        super.beforeStart();
    }

    @Override
    public void afterStart() {
        super.afterStart();
        extCommon.afterStart();
    }

    @Override
    public void beforeClusterStateChange(
            ClusterState currState, ClusterState requestedState, boolean isTransient) {
        super.beforeClusterStateChange(currState, requestedState, isTransient);
        extCommon.beforeClusterStateChange(requestedState);
    }

    @Override
    public void onClusterStateChange(ClusterState newState, boolean isTransient) {
        super.onClusterStateChange(newState, isTransient);
        extCommon.onClusterStateChange(newState);
    }

    @Override
    public Map<String, Object> createExtensionServices() {
        return extCommon.createExtensionServices();
    }

    @Override
    public TextCommandService createTextCommandService() {
        return new TextCommandServiceImpl(node) {
            {
                register(HTTP_GET, new Log4j2HttpGetCommandProcessor(this));
                register(HTTP_POST, new Log4j2HttpPostCommandProcessor(this));
                register(HTTP_GET, new RestHttpGetCommandProcessor(this));
                register(HTTP_POST, new RestHttpPostCommandProcessor(this));
            }
        };
    }

    @Override
    public void printNodeInfo() {
        extCommon.printNodeInfo(systemLogger);
    }
}
|
在这个代码中, 我们可以看到在构造方法中, 初始化了SeaTunnelServer这个类, 而这个类与最开始的类是同名的, 但是在不同的包下, 这个类的完整类名为: org.apache.seatunnel.engine.server.SeaTunnelServer
我们看下这个类的代码:
 1
 2
 3
 4
 5
 6
 7
 8
 9
10
11
12
13
14
15
16
17
18
19
20
21
22
23
24
25
26
27
28
29
30
31
32
33
34
35
36
37
38
39
40
41
42
43
44
45
46
47
48
49
|
public class SeaTunnelServer
        implements ManagedService, MembershipAwareService, LiveOperationsTracker {

    private static final ILogger LOGGER = Logger.getLogger(SeaTunnelServer.class);

    public static final String SERVICE_NAME = "st:impl:seaTunnelServer";

    private NodeEngineImpl nodeEngine;
    private final LiveOperationRegistry liveOperationRegistry;

    private volatile SlotService slotService;
    private TaskExecutionService taskExecutionService;
    private ClassLoaderService classLoaderService;
    private CoordinatorService coordinatorService;
    private ScheduledExecutorService monitorService;

    @Getter private SeaTunnelHealthMonitor seaTunnelHealthMonitor;

    private final SeaTunnelConfig seaTunnelConfig;

    private volatile boolean isRunning = true;

    public SeaTunnelServer(@NonNull SeaTunnelConfig seaTunnelConfig) {
        this.liveOperationRegistry = new LiveOperationRegistry();
        this.seaTunnelConfig = seaTunnelConfig;
        LOGGER.info("SeaTunnel server start...");
    }


    @Override
    public void init(NodeEngine engine, Properties hzProperties) {
         ...
        if (EngineConfig.ClusterRole.MASTER_AND_WORKER.ordinal()
                == seaTunnelConfig.getEngineConfig().getClusterRole().ordinal()) {
            startWorker();
            startMaster();

        } else if (EngineConfig.ClusterRole.WORKER.ordinal()
                == seaTunnelConfig.getEngineConfig().getClusterRole().ordinal()) {
            startWorker();
        } else {
            startMaster();
        }
        ...
    }

    ....
}
|
这个类是SeaTunnel Server端的核心代码, 在这个类中会根据节点的角色来启动相关的组件。
稍微总结下seatunnel的流程:
SeaTunnel是借助于hazelcast的基础能力, 来实现集群端的组网, 并调用启动核心的代码。对于这一块有想深入了解的朋友可以去看下hazelcast的相关内容,这里仅仅列出了调用路径。
按照顺序所加载调用的类为
- starter.SeaTunnelServer
- ServerExecutreCommand
- SeaTunnelNodeContext
- NodeExtension
- server.SeaTunnelServer

接下来再来详细看下master节点以及worker节点中所创建的组件
master相关组件
 1
 2
 3
 4
 5
 6
 7
 8
 9
10
|
private void startMaster() {
    coordinatorService =
            new CoordinatorService(nodeEngine, this, seaTunnelConfig.getEngineConfig());
    monitorService = Executors.newSingleThreadScheduledExecutor();
    monitorService.scheduleAtFixedRate(
            this::printExecutionInfo,
            0,
            seaTunnelConfig.getEngineConfig().getPrintExecutionInfoInterval(),
            TimeUnit.SECONDS);
}
|
在这个方法内,可以看到一个初始化了两个组件
coordinatorService 协调器组件monitorService 监控组件
监控组件所做的事情,在这个方法内,也可以看到,就是周期性的打印信息。
CoordinatorService
 1
 2
 3
 4
 5
 6
 7
 8
 9
10
11
12
13
14
15
16
17
18
19
20
21
22
23
24
25
26
27
28
29
30
31
32
33
34
35
36
37
38
39
40
41
42
43
44
45
|
public CoordinatorService(
        @NonNull NodeEngineImpl nodeEngine,
        @NonNull SeaTunnelServer seaTunnelServer,
        EngineConfig engineConfig) {
    this.nodeEngine = nodeEngine;
    this.logger = nodeEngine.getLogger(getClass());
    this.executorService =
            Executors.newCachedThreadPool(
                    new ThreadFactoryBuilder()
                            .setNameFormat("seatunnel-coordinator-service-%d")
                            .build());
    this.seaTunnelServer = seaTunnelServer;
    this.engineConfig = engineConfig;
    masterActiveListener = Executors.newSingleThreadScheduledExecutor();
    masterActiveListener.scheduleAtFixedRate(
            this::checkNewActiveMaster, 0, 100, TimeUnit.MILLISECONDS);
}


private void checkNewActiveMaster() {
    try {
        if (!isActive && this.seaTunnelServer.isMasterNode()) {
            logger.info(
                    "This node become a new active master node, begin init coordinator service");
            if (this.executorService.isShutdown()) {
                this.executorService =
                        Executors.newCachedThreadPool(
                                new ThreadFactoryBuilder()
                                        .setNameFormat("seatunnel-coordinator-service-%d")
                                        .build());
            }
            initCoordinatorService();
            isActive = true;
        } else if (isActive && !this.seaTunnelServer.isMasterNode()) {
            isActive = false;
            logger.info(
                    "This node become leave active master node, begin clear coordinator service");
            clearCoordinatorService();
        }
    } catch (Exception e) {
        isActive = false;
        logger.severe(ExceptionUtils.getMessage(e));
        throw new SeaTunnelEngineException("check new active master error, stop loop", e);
    }
}
|
协调器组件启动之后,会创建一个线程定时检测自身与集群状态,检查是否需要进行切换。
状态检查有两种
- 当本地标记不是master,但在hazelcast集群中被选举为master时
调用
initCoordinatorService()来进行状态的初始化,同时修改本地状态标记信息
- 当本地标记自身为master,但是在集群中已经不是master时
状态清理
我们看下initCoordinatorService()方法
 1
 2
 3
 4
 5
 6
 7
 8
 9
10
11
12
13
14
15
16
17
18
19
20
21
22
23
24
25
26
27
28
29
30
31
32
33
34
35
36
37
38
39
40
41
42
43
44
|
private void initCoordinatorService() {
    // 从hazelcast中获取分布式IMAP
    runningJobInfoIMap =
            nodeEngine.getHazelcastInstance().getMap(Constant.IMAP_RUNNING_JOB_INFO);
    runningJobStateIMap =
            nodeEngine.getHazelcastInstance().getMap(Constant.IMAP_RUNNING_JOB_STATE);
    runningJobStateTimestampsIMap =
            nodeEngine.getHazelcastInstance().getMap(Constant.IMAP_STATE_TIMESTAMPS);
    ownedSlotProfilesIMap =
            nodeEngine.getHazelcastInstance().getMap(Constant.IMAP_OWNED_SLOT_PROFILES);
    metricsImap = nodeEngine.getHazelcastInstance().getMap(Constant.IMAP_RUNNING_JOB_METRICS);
    // 初始化JobHistoryService
    jobHistoryService =
            new JobHistoryService(
                    runningJobStateIMap,
                    logger,
                    runningJobMasterMap,
                    nodeEngine.getHazelcastInstance().getMap(Constant.IMAP_FINISHED_JOB_STATE),
                    nodeEngine
                            .getHazelcastInstance()
                            .getMap(Constant.IMAP_FINISHED_JOB_METRICS),
                    nodeEngine
                            .getHazelcastInstance()
                            .getMap(Constant.IMAP_FINISHED_JOB_VERTEX_INFO),
                    engineConfig.getHistoryJobExpireMinutes());
    // 初始化EventProcess, 用于发送事件到其他服务
    eventProcessor =
            createJobEventProcessor(
                    engineConfig.getEventReportHttpApi(),
                    engineConfig.getEventReportHttpHeaders(),
                    nodeEngine);

    // If the user has configured the connector package service, create it  on the master node.
    ConnectorJarStorageConfig connectorJarStorageConfig =
            engineConfig.getConnectorJarStorageConfig();
    if (connectorJarStorageConfig.getEnable()) {
        connectorPackageService = new ConnectorPackageService(seaTunnelServer);
    }
    // 集群恢复后, 尝试恢复之前的历史任务
    restoreAllJobFromMasterNodeSwitchFuture =
            new PassiveCompletableFuture(
                    CompletableFuture.runAsync(
                            this::restoreAllRunningJobFromMasterNodeSwitch, executorService));
}
|
在coordinatorservice中, 会拉取分布式MAP, 这个数据结构是hazelcast的一个数据结构, 可以认为是在集群中数据一致的一个MAP。 在seatunnel中, 使用这个结构来存储任务信息, slot信息等。
在这里还会创建EventProcessor, 这个类是用来将事件通知到其他服务, 比如任务失败, 可以发送信息到配置的接口中, 实现事件推送。
最后, 由于节点启动, 可能是集群异常重启, 或者节点切换, 这时需要恢复历史运行的任务, 那么就会从刚刚获取到的IMAP中获取到之前正在跑的任务列表, 然后尝试进行恢复。
这里的IMAP信息可以开启持久化将信息存储到HDFS等文件系统中, 这样可以在系统完全重启后仍然能够读取到之前的任务状态并进行恢复。
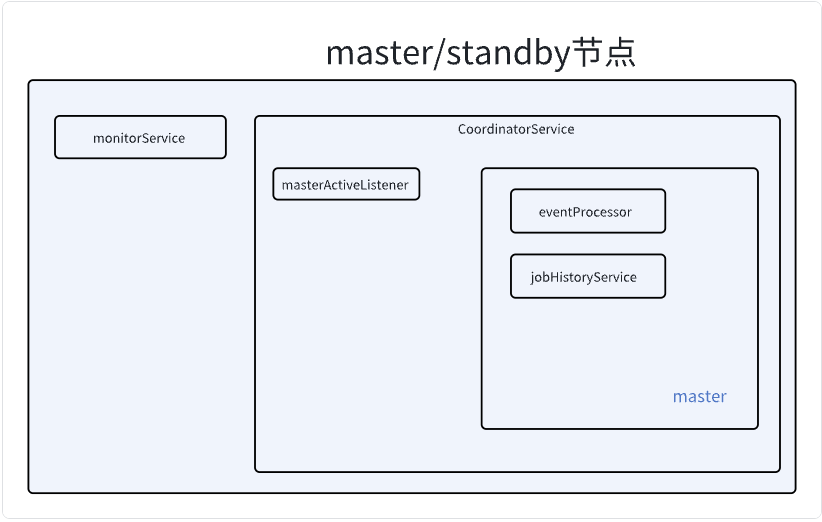
在CoordinatorService中运行的组件有:
- executorService (所有可能被选举为master的节点)
- masterActiveListener(所有可能被选举为master的节点)
- jobHistoryService (master节点)
- eventProcessor (master节点)
 – TODO 修改图片,添加executorService
接下来再看下worker节点所启动的组件
– TODO 修改图片,添加executorService
接下来再看下worker节点所启动的组件
worker节点
 1
 2
 3
 4
 5
 6
 7
 8
 9
10
11
12
13
14
15
16
17
18
19
20
21
22
23
24
25
|
private void startWorker() {
    taskExecutionService =
            new TaskExecutionService(
                    classLoaderService, nodeEngine, nodeEngine.getProperties());
    nodeEngine.getMetricsRegistry().registerDynamicMetricsProvider(taskExecutionService);
    taskExecutionService.start();
    getSlotService();
}

public SlotService getSlotService() {
    if (slotService == null) {
        synchronized (this) {
            if (slotService == null) {
                SlotService service =
                        new DefaultSlotService(
                                nodeEngine,
                                taskExecutionService,
                                seaTunnelConfig.getEngineConfig().getSlotServiceConfig());
                service.init();
                slotService = service;
            }
        }
    }
    return slotService;
}
|
我们可以看到在startWorker方法中, 也会初始化两个组件
taskExecutionService 任务执行线程池slotService 任务资源管理
SlotService
先来看下SlotService的初始化
 1
 2
 3
 4
 5
 6
 7
 8
 9
10
11
12
13
14
15
16
17
18
19
20
21
22
23
24
25
26
27
28
29
30
31
32
33
34
35
36
37
38
|
@Override
public void init() {
    initStatus = true;
    slotServiceSequence = UUID.randomUUID().toString();
    contexts = new ConcurrentHashMap<>();
    assignedSlots = new ConcurrentHashMap<>();
    unassignedSlots = new ConcurrentHashMap<>();
    unassignedResource = new AtomicReference<>(new ResourceProfile());
    assignedResource = new AtomicReference<>(new ResourceProfile());
    scheduledExecutorService =
            Executors.newSingleThreadScheduledExecutor(
                    r ->
                            new Thread(
                                    r,
                                    String.format(
                                            "hz.%s.seaTunnel.slotService.thread",
                                            nodeEngine.getHazelcastInstance().getName())));
    if (!config.isDynamicSlot()) {
        initFixedSlots();
    }
    unassignedResource.set(getNodeResource());
    scheduledExecutorService.scheduleAtFixedRate(
            () -> {
                try {
                    LOGGER.fine(
                            "start send heartbeat to resource manager, this address: "
                                    + nodeEngine.getClusterService().getThisAddress());
                    sendToMaster(new WorkerHeartbeatOperation(getWorkerProfile())).join();
                } catch (Exception e) {
                    LOGGER.warning(
                            "failed send heartbeat to resource manager, will retry later. this address: "
                                    + nodeEngine.getClusterService().getThisAddress());
                }
            },
            0,
            DEFAULT_HEARTBEAT_TIMEOUT,
            TimeUnit.MILLISECONDS);
}
|
在SeaTunnel中,会有一个动态slot(DynamicSlot) 的概念。
如果设置为true, 则每个节点不再有Slot数量的限制,可以提交任意数量的任务到此节点上。
如果设置为固定数量的slot, 那么该节点仅能接受这些slot数量的任务运行。
两者的区别在于你的同步使用场景,
如果你的任务都是大数据量的同步任务,那么最好可以设置成固定数量的Slot,避免提交过多任务影响单个节点的稳定性
但是如果每个任务的数据量都很少,其实可以选择动态Slot,这样可以更大限度的提升资源使用率
在初始化时, 会根据是否为动态slot来进行slot数量的初始化
 1
 2
 3
 4
 5
 6
 7
 8
 9
10
11
12
13
|
private void initFixedSlots() {
    long maxMemory = Runtime.getRuntime().maxMemory();
    for (int i = 0; i < config.getSlotNum(); i++) {
        unassignedSlots.put(
                i,
                new SlotProfile(
                        nodeEngine.getThisAddress(),
                        i,
                        new ResourceProfile(
                                CPU.of(0), Memory.of(maxMemory / config.getSlotNum())),
                        slotServiceSequence));
    }
}
|
同时我们也可以看到初始化时会启动一个线程, 定时向master节点发送心跳, 心跳信息中则包含了当前节点的信息, 包括已经分配的, 未分配的slot数量等属性,worker节点通过心跳将信息定时更新给master。
 1
 2
 3
 4
 5
 6
 7
 8
 9
10
11
12
13
14
15
|
@Override
public synchronized WorkerProfile getWorkerProfile() {
    WorkerProfile workerProfile = new WorkerProfile(nodeEngine.getThisAddress());
    workerProfile.setProfile(getNodeResource());
    workerProfile.setAssignedSlots(assignedSlots.values().toArray(new SlotProfile[0]));
    workerProfile.setUnassignedSlots(unassignedSlots.values().toArray(new SlotProfile[0]));
    workerProfile.setUnassignedResource(unassignedResource.get());
    workerProfile.setAttributes(nodeEngine.getLocalMember().getAttributes());
    workerProfile.setDynamicSlot(config.isDynamicSlot());
    return workerProfile;
}

private ResourceProfile getNodeResource() {
    return new ResourceProfile(CPU.of(0), Memory.of(Runtime.getRuntime().maxMemory()));
}
|
TaskExecutionService
这个组件与任务提交相关, 这里先简单看下,与任务提交的相关代码在后续再深入查看。
在worker节点初始化时, 会新建一个TaskExecutionService对象,并调用其start方法
 1
 2
 3
 4
 5
 6
 7
 8
 9
10
11
12
13
14
15
16
17
18
19
20
21
22
23
24
25
26
27
28
29
30
31
32
33
34
35
36
37
38
39
40
41
42
43
44
45
46
47
48
49
50
51
52
53
54
55
56
57
58
59
60
61
62
63
64
65
66
67
68
69
70
71
72
|
private final ExecutorService executorService =
        newCachedThreadPool(new BlockingTaskThreadFactory());

public TaskExecutionService(
        ClassLoaderService classLoaderService,
        NodeEngineImpl nodeEngine,
        HazelcastProperties properties) {
        // 加载配置信息
    seaTunnelConfig = ConfigProvider.locateAndGetSeaTunnelConfig();
    this.hzInstanceName = nodeEngine.getHazelcastInstance().getName();
    this.nodeEngine = nodeEngine;
    this.classLoaderService = classLoaderService;
    this.logger = nodeEngine.getLoggingService().getLogger(TaskExecutionService.class);
    // 指标相关
    MetricsRegistry registry = nodeEngine.getMetricsRegistry();
    MetricDescriptor descriptor =
            registry.newMetricDescriptor()
                    .withTag(MetricTags.SERVICE, this.getClass().getSimpleName());
    registry.registerStaticMetrics(descriptor, this);
    scheduledExecutorService = Executors.newSingleThreadScheduledExecutor();
    // 定时任务更新指标到IMAP中
    scheduledExecutorService.scheduleAtFixedRate(
            this::updateMetricsContextInImap,
            0,
            seaTunnelConfig.getEngineConfig().getJobMetricsBackupInterval(),
            TimeUnit.SECONDS);

    serverConnectorPackageClient =
            new ServerConnectorPackageClient(nodeEngine, seaTunnelConfig);

    eventBuffer = new ArrayBlockingQueue<>(2048);
    // 事件转发服务
    eventForwardService =
            Executors.newSingleThreadExecutor(
                    new ThreadFactoryBuilder().setNameFormat("event-forwarder-%d").build());
    eventForwardService.submit(
            () -> {
                List<Event> events = new ArrayList<>();
                RetryUtils.RetryMaterial retryMaterial =
                        new RetryUtils.RetryMaterial(2, true, e -> true);
                while (!Thread.currentThread().isInterrupted()) {
                    try {
                        events.clear();

                        Event first = eventBuffer.take();
                        events.add(first);

                        eventBuffer.drainTo(events, 500);
                        JobEventReportOperation operation = new JobEventReportOperation(events);

                        RetryUtils.retryWithException(
                                () ->
                                        NodeEngineUtil.sendOperationToMasterNode(
                                                        nodeEngine, operation)
                                                .join(),
                                retryMaterial);

                        logger.fine("Event forward success, events " + events.size());
                    } catch (InterruptedException e) {
                        Thread.currentThread().interrupt();
                        logger.info("Event forward thread interrupted");
                    } catch (Throwable t) {
                        logger.warning(
                                "Event forward failed, discard events " + events.size(), t);
                    }
                }
            });
}

public void start() {
    runBusWorkSupplier.runNewBusWork(false);
}
|
在这个类中,有一个成员变量,创建了一个线程池,该线程池为CachedThreadPool,没有大小限制。

在构造方法中构建了一个定时任务,这个任务会将本地执行的一些指标信息更新到IMAP中。
同时创建了一个任务来将Event信息发送给master节点, 由master节点再将这些Event发送给外部服务。

至此, 服务端所有服务组件都已启动完成
master节点与备选节点上会
- 定时检查自己是否为master节点, 如果是则进行相应的状态转化
master节点上会
- 定时打印集群的状态信息。
- 启动转发服务, 将要推送的事件转发到外部服务
在worker节点上, 启动后会
- 定时将状态信息上报到master节点
- 将任务信息更新到IMAP里面。
- 将在worker产生的要推送给外部服务的事件转发到master节点上。
下面我们会再从一个简单的任务开始, 从客户端看下任务的提交流程。
客户端提交任务
这里以命令行提交任务的形式来讲解任务的提交流程。
命令行提交任务的命令为
./bin/seatunnel/sh -c <config_path>
我们查看这个脚本文件后可以看到这个脚本中最后会调用org.apache.seatunnel.core.starter.seatunnel.SeaTunnelClient这个类
 1
 2
 3
 4
 5
 6
 7
 8
 9
10
11
|
public class SeaTunnelClient {
    public static void main(String[] args) throws CommandException {
        ClientCommandArgs clientCommandArgs =
                CommandLineUtils.parse(
                        args,
                        new ClientCommandArgs(),
                        EngineType.SEATUNNEL.getStarterShellName(),
                        true);
        SeaTunnel.run(clientCommandArgs.buildCommand());
    }
}
|
在这个类中,仅有一个main方法, 与上面的server端的代码类似,不过这里构建的是ClientCommandArgs
解析命令行参数
我们查看clientCommandArgs.buildCommand方法
 1
 2
 3
 4
 5
 6
 7
 8
 9
10
11
12
13
|
public Command<?> buildCommand() {
    Common.setDeployMode(getDeployMode());
    if (checkConfig) {
        return new SeaTunnelConfValidateCommand(this);
    }
    if (encrypt) {
        return new ConfEncryptCommand(this);
    }
    if (decrypt) {
        return new ConfDecryptCommand(this);
    }
    return new ClientExecuteCommand(this);
}
|
这里是调用了jcommander来解析参数, 会根据用户传递的参数来决定构建哪个类, 例如是对配置文件做检查,还是加密文件,解密文件以及是不是Client提交任务的命令。
这里就不再讲解其他几个类,主要来看下ClientExecuteCommand
这个类的主要代码都在execute方法中, 整体方法比较长, 我将分段来描述每一段的作业
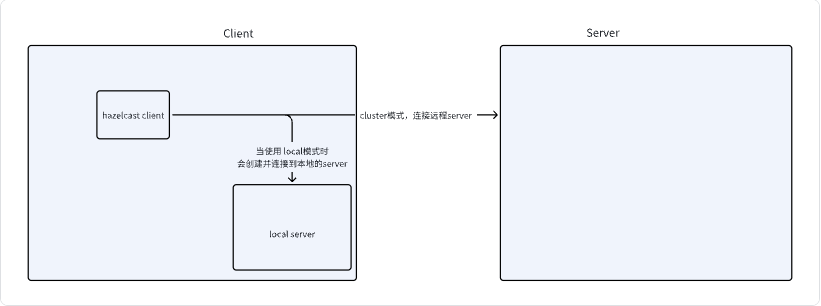
连接集群
在这一部分代码中, 做的事情是读取hazelcast-client.yaml文件,尝试建立与server端的连接, 当使用local模式时,会现在本地创建一个hazelcast的实例, 然后连接到这个实例上, 当使用cluster模式时, 则直接连接到集群上。
 1
 2
 3
 4
 5
 6
 7
 8
 9
10
11
12
13
14
15
16
17
18
19
20
21
22
23
24
25
26
27
28
29
30
31
32
33
34
35
36
37
38
39
40
41
42
43
44
45
46
47
48
49
50
51
52
53
54
55
56
57
58
59
|
public void execute() throws CommandExecuteException {
    JobMetricsRunner.JobMetricsSummary jobMetricsSummary = null;
    LocalDateTime startTime = LocalDateTime.now();
    LocalDateTime endTime = LocalDateTime.now();
    SeaTunnelConfig seaTunnelConfig = ConfigProvider.locateAndGetSeaTunnelConfig();
    try {
        String clusterName = clientCommandArgs.getClusterName();
        // 加载配置信息
        ClientConfig clientConfig = ConfigProvider.locateAndGetClientConfig();
        // 根据此次提交的任务类型,当使用local模式时,意味着上面服务端的流程是没有执行的,
        // 所以先创建一个本地seatunnel server
        if (clientCommandArgs.getMasterType().equals(MasterType.LOCAL)) {
            clusterName =
                    creatRandomClusterName(
                            StringUtils.isNotEmpty(clusterName)
                                    ? clusterName
                                    : Constant.DEFAULT_SEATUNNEL_CLUSTER_NAME);
            instance = createServerInLocal(clusterName, seaTunnelConfig);
            int port = instance.getCluster().getLocalMember().getSocketAddress().getPort();
            clientConfig
                    .getNetworkConfig()
                    .setAddresses(Collections.singletonList("localhost:" + port));
        }
        // 与远程或本地的seatunnel server连接,创建一个engineClient
        if (StringUtils.isNotEmpty(clusterName)) {
            seaTunnelConfig.getHazelcastConfig().setClusterName(clusterName);
            clientConfig.setClusterName(clusterName);
        }
        engineClient = new SeaTunnelClient(clientConfig);
        // 省略第二段代码
        // 省略第三段代码
        }
    } catch (Exception e) {
        throw new CommandExecuteException("SeaTunnel job executed failed", e);
    } finally {
        if (jobMetricsSummary != null) {
            // 任务结束,打印日志
            log.info(
                    StringFormatUtils.formatTable(
                            "Job Statistic Information",
                            "Start Time",
                            DateTimeUtils.toString(
                                    startTime, DateTimeUtils.Formatter.YYYY_MM_DD_HH_MM_SS),
                            "End Time",
                            DateTimeUtils.toString(
                                    endTime, DateTimeUtils.Formatter.YYYY_MM_DD_HH_MM_SS),
                            "Total Time(s)",
                            Duration.between(startTime, endTime).getSeconds(),
                            "Total Read Count",
                            jobMetricsSummary.getSourceReadCount(),
                            "Total Write Count",
                            jobMetricsSummary.getSinkWriteCount(),
                            "Total Failed Count",
                            jobMetricsSummary.getSourceReadCount()
                                    - jobMetricsSummary.getSinkWriteCount()));
        }
        closeClient();
    }
}
|
判断任务类型,调用相关方法
则是根据用户的参数来判断这次的任务类型是什么, 根据参数的不同,调用不同的方法, 例如取消任务, 则会调用相应的取消任务方法, 这次对这里的几个任务不再具体分析, 这次以提交任务为主, 当我们将提交任务的流程弄明白, 这些再去看时也就简单了。
 1
 2
 3
 4
 5
 6
 7
 8
 9
10
11
12
13
14
15
16
17
18
19
20
21
22
23
24
25
26
27
28
29
|
 if (clientCommandArgs.isListJob()) {
            String jobStatus = engineClient.getJobClient().listJobStatus(true);
            System.out.println(jobStatus);
} else if (clientCommandArgs.isGetRunningJobMetrics()) {
    String runningJobMetrics = engineClient.getJobClient().getRunningJobMetrics();
    System.out.println(runningJobMetrics);
} else if (null != clientCommandArgs.getJobId()) {
    String jobState =
            engineClient
                    .getJobClient()
                    .getJobDetailStatus(Long.parseLong(clientCommandArgs.getJobId()));
    System.out.println(jobState);
} else if (null != clientCommandArgs.getCancelJobId()) {
    engineClient
            .getJobClient()
            .cancelJob(Long.parseLong(clientCommandArgs.getCancelJobId()));
} else if (null != clientCommandArgs.getMetricsJobId()) {
    String jobMetrics =
            engineClient
                    .getJobClient()
                    .getJobMetrics(Long.parseLong(clientCommandArgs.getMetricsJobId()));
    System.out.println(jobMetrics);
} else if (null != clientCommandArgs.getSavePointJobId()) {
    engineClient
            .getJobClient()
            .savePointJob(Long.parseLong(clientCommandArgs.getSavePointJobId()));
} else {
        // 省略第三段代码
}
|
提交任务到集群
 1
 2
 3
 4
 5
 6
 7
 8
 9
10
11
12
13
14
15
16
17
18
19
20
21
22
23
24
25
26
27
28
29
30
31
32
33
34
35
36
37
38
39
40
41
42
43
44
45
46
47
48
49
50
51
52
53
54
55
56
57
58
59
60
61
62
63
64
65
66
67
68
69
70
71
72
73
74
75
76
77
78
79
80
81
82
83
84
85
86
87
88
|
// 获取配置文件的路径, 并检查文件是否存在
Path configFile = FileUtils.getConfigPath(clientCommandArgs);
checkConfigExist(configFile);
JobConfig jobConfig = new JobConfig();
// 下面会根据这次任务是根据savepoint重启还是启动新任务来调用不同的方法来构建ClientJobExecutionEnvironment对象
ClientJobExecutionEnvironment jobExecutionEnv;
jobConfig.setName(clientCommandArgs.getJobName());
if (null != clientCommandArgs.getRestoreJobId()) {
    jobExecutionEnv =
            engineClient.restoreExecutionContext(
                    configFile.toString(),
                    clientCommandArgs.getVariables(),
                    jobConfig,
                    seaTunnelConfig,
                    Long.parseLong(clientCommandArgs.getRestoreJobId()));
} else {
    jobExecutionEnv =
            engineClient.createExecutionContext(
                    configFile.toString(),
                    clientCommandArgs.getVariables(),
                    jobConfig,
                    seaTunnelConfig,
                    clientCommandArgs.getCustomJobId() != null
                            ? Long.parseLong(clientCommandArgs.getCustomJobId())
                            : null);
}
// get job start time
startTime = LocalDateTime.now();
// create job proxy
// 提交任务
ClientJobProxy clientJobProxy = jobExecutionEnv.execute();
// 判断是否为异步提交,当异步提交时会直接退出,不进行状态检查
if (clientCommandArgs.isAsync()) {
    if (clientCommandArgs.getMasterType().equals(MasterType.LOCAL)) {
        log.warn("The job is running in local mode, can not use async mode.");
    } else {
        return;
    }
}
// register cancelJob hook
// 添加hook方法, 当提交完成任务后, 命令行退出时, 取消刚刚提交的任务
Runtime.getRuntime()
        .addShutdownHook(
                new Thread(
                        () -> {
                            CompletableFuture<Void> future =
                                    CompletableFuture.runAsync(
                                            () -> {
                                                log.info(
                                                        "run shutdown hook because get close signal");
                                                shutdownHook(clientJobProxy);
                                            });
                            try {
                                future.get(15, TimeUnit.SECONDS);
                            } catch (Exception e) {
                                log.error("Cancel job failed.", e);
                            }
                        }));


// 同步,检查任务状态相关代码
// 获取任务id, 然后启动后台线程定时检查任务状态
long jobId = clientJobProxy.getJobId();
JobMetricsRunner jobMetricsRunner = new JobMetricsRunner(engineClient, jobId);
// 创建线程,定时检查状态
executorService =
        Executors.newSingleThreadScheduledExecutor(
                new ThreadFactoryBuilder()
                        .setNameFormat("job-metrics-runner-%d")
                        .setDaemon(true)
                        .build());
executorService.scheduleAtFixedRate(
        jobMetricsRunner,
        0,
        seaTunnelConfig.getEngineConfig().getPrintJobMetricsInfoInterval(),
        TimeUnit.SECONDS);
// wait for job complete
// 等待任务结束, 检查任务状态,当任务为异常退出时, 抛出异常
JobResult jobResult = clientJobProxy.waitForJobCompleteV2();
jobStatus = jobResult.getStatus();
if (StringUtils.isNotEmpty(jobResult.getError())
        || jobResult.getStatus().equals(JobStatus.FAILED)) {
    throw new SeaTunnelEngineException(jobResult.getError());
}
// get job end time
endTime = LocalDateTime.now();
// get job statistic information when job finished
jobMetricsSummary = engineClient.getJobMetricsSummary(jobId);
|
下面我们就看下jobExecutionEnv这个类的初始化与execute方法
 1
 2
 3
 4
 5
 6
 7
 8
 9
10
11
12
13
14
15
16
17
18
19
20
21
22
23
|
public ClientJobExecutionEnvironment(
        JobConfig jobConfig,
        String jobFilePath,
        List<String> variables,
        SeaTunnelHazelcastClient seaTunnelHazelcastClient,
        SeaTunnelConfig seaTunnelConfig,
        boolean isStartWithSavePoint,
        Long jobId) {
    super(jobConfig, isStartWithSavePoint);
    this.jobFilePath = jobFilePath;
    this.variables = variables;
    this.seaTunnelHazelcastClient = seaTunnelHazelcastClient;
    this.jobClient = new JobClient(seaTunnelHazelcastClient);
    this.seaTunnelConfig = seaTunnelConfig;
    Long finalJobId;
    if (isStartWithSavePoint || jobId != null) {
        finalJobId = jobId;
    } else {
        finalJobId = jobClient.getNewJobId();
    }
    this.jobConfig.setJobContext(new JobContext(finalJobId));
    this.connectorPackageClient = new ConnectorPackageClient(seaTunnelHazelcastClient);
}
|
这个类的初始化中,很简单,只是变量赋值操作,没有做其他初始化操作。再来看下execute方法
 1
 2
 3
 4
 5
 6
 7
 8
 9
10
11
12
13
14
15
16
17
|
public ClientJobProxy execute() throws ExecutionException, InterruptedException {
    LogicalDag logicalDag = getLogicalDag();
    log.info(
            "jarUrls is : [{}]",
            jarUrls.stream().map(URL::getPath).collect(Collectors.joining(", ")));
    JobImmutableInformation jobImmutableInformation =
            new JobImmutableInformation(
                    Long.parseLong(jobConfig.getJobContext().getJobId()),
                    jobConfig.getName(),
                    isStartWithSavePoint,
                    seaTunnelHazelcastClient.getSerializationService().toData(logicalDag),
                    jobConfig,
                    new ArrayList<>(jarUrls),
                    new ArrayList<>(connectorJarIdentifiers));

    return jobClient.createJobProxy(jobImmutableInformation);
}
|
这个方法中,先调用getLogicalDag生产了逻辑计划,然后构建JobImmutableInformation 信息,传递给jobClient,我们先看后面的步骤,等会再看如何生成的逻辑计划。
 1
 2
 3
 4
 5
 6
 7
 8
 9
10
11
12
13
14
15
16
17
18
19
20
21
22
23
24
25
26
27
28
29
30
31
32
33
34
|
public ClientJobProxy createJobProxy(@NonNull JobImmutableInformation jobImmutableInformation) {
    return new ClientJobProxy(hazelcastClient, jobImmutableInformation);
}


public ClientJobProxy(
        @NonNull SeaTunnelHazelcastClient seaTunnelHazelcastClient,
        @NonNull JobImmutableInformation jobImmutableInformation) {
    this.seaTunnelHazelcastClient = seaTunnelHazelcastClient;
    this.jobId = jobImmutableInformation.getJobId();
    submitJob(jobImmutableInformation);
}

private void submitJob(JobImmutableInformation jobImmutableInformation) {
    LOGGER.info(
            String.format(
                    "Start submit job, job id: %s, with plugin jar %s",
                    jobImmutableInformation.getJobId(),
                    jobImmutableInformation.getPluginJarsUrls()));
    ClientMessage request =
            SeaTunnelSubmitJobCodec.encodeRequest(
                    jobImmutableInformation.getJobId(),
                    seaTunnelHazelcastClient
                            .getSerializationService()
                            .toData(jobImmutableInformation),
                    jobImmutableInformation.isStartWithSavePoint());
    PassiveCompletableFuture<Void> submitJobFuture =
            seaTunnelHazelcastClient.requestOnMasterAndGetCompletableFuture(request);
    submitJobFuture.join();
    LOGGER.info(
            String.format(
                    "Submit job finished, job id: %s, job name: %s",
                    jobImmutableInformation.getJobId(), jobImmutableInformation.getJobName()));
}
|
在这里的代码可以看到,生成JobImmutableInformation后,会将这个信息转换为ClientMessage(SeaTunnelSubmitJobCodec)然后发送给Master节点,也就是hazelcast server中的master节点。提交完成之后又回到上面的任务状态检测相关步骤。
这里的消息发送是调用了hazelcast的相关方法,我们对其的实现不需要关注。
逻辑计划解析
下面一章会再回到Server端看下当收到client端发送的提交任务后的处理逻辑,这里我们先回到前面,看下在客户端如何生成的逻辑计划。
1
|
LogicalDag logicalDag = getLogicalDag();
|
先看下LogicalDag的结构
1
2
3
4
5
|
@Getter private JobConfig jobConfig;
private final Set<LogicalEdge> edges = new LinkedHashSet<>();
private final Map<Long, LogicalVertex> logicalVertexMap = new LinkedHashMap<>();
private IdGenerator idGenerator;
private boolean isStartWithSavePoint = false;
|
在这个类里有这几个变量,有两个比较关键的类LogicalEdge和LogicalVertex,通过任务之间的关联关联构建出DAG。
LogicalEdge的类中存储的变量很简单, 存储了两个点的关系。
1
2
3
4
5
6
7
8
9
|
/** The input vertex connected to this edge. */
private LogicalVertex inputVertex;

/** The target vertex connected to this edge. */
private LogicalVertex targetVertex;

private Long inputVertexId;

private Long targetVertexId;
|
LogicalVertex的变量为这几个变量,有当前点的编号,以及所需的并行度,以及Action接口, Action接口会有SourceAction,SinkAction,TransformAction等不同的实现类。
1
2
3
4
5
|
private Long vertexId;
private Action action;

/** Number of subtasks to split this task into at runtime. */
private int parallelism;
|
看下getLogicalDag的方法
 1
 2
 3
 4
 5
 6
 7
 8
 9
10
11
12
13
14
15
16
17
18
19
20
21
22
23
24
25
26
27
28
29
30
31
32
33
34
35
36
|
public LogicalDag getLogicalDag() {
    //
    ImmutablePair<List<Action>, Set<URL>> immutablePair = getJobConfigParser().parse(null);
    actions.addAll(immutablePair.getLeft());
    // seatunnel有个功能是不需要服务端所有节点有全部的依赖,可以在客户端中将所需依赖上传到服务端
    // 这里的if-else是这个功能的一些逻辑判断,判断是否需要从客户端将jar包上传到服务端,从而服务端不需要维护全部的jar包
    boolean enableUploadConnectorJarPackage =
            seaTunnelConfig.getEngineConfig().getConnectorJarStorageConfig().getEnable();
    if (enableUploadConnectorJarPackage) {
        Set<ConnectorJarIdentifier> commonJarIdentifiers =
                connectorPackageClient.uploadCommonPluginJars(
                        Long.parseLong(jobConfig.getJobContext().getJobId()), commonPluginJars);
        Set<URL> commonPluginJarUrls = getJarUrlsFromIdentifiers(commonJarIdentifiers);
        Set<ConnectorJarIdentifier> pluginJarIdentifiers = new HashSet<>();
        uploadActionPluginJar(actions, pluginJarIdentifiers);
        Set<URL> connectorPluginJarUrls = getJarUrlsFromIdentifiers(pluginJarIdentifiers);
        connectorJarIdentifiers.addAll(commonJarIdentifiers);
        connectorJarIdentifiers.addAll(pluginJarIdentifiers);
        jarUrls.addAll(commonPluginJarUrls);
        jarUrls.addAll(connectorPluginJarUrls);
        actions.forEach(
                action -> {
                    addCommonPluginJarsToAction(
                            action, commonPluginJarUrls, commonJarIdentifiers);
                });
    } else {
        jarUrls.addAll(commonPluginJars);
        jarUrls.addAll(immutablePair.getRight());
        actions.forEach(
                action -> {
                    addCommonPluginJarsToAction(
                            action, new HashSet<>(commonPluginJars), Collections.emptySet());
                });
    }
    return getLogicalDagGenerator().generate();
}
|
方法中首先调用了.parse(null)方法,此方法的返回值是一个不可变二元组,第一个值为List<Action>对象,getJobConfigParser返回的对象是MultipleTableJobConfigParser
 1
 2
 3
 4
 5
 6
 7
 8
 9
10
11
12
13
14
15
|
public MultipleTableJobConfigParser(
        Config seaTunnelJobConfig,
        IdGenerator idGenerator,
        JobConfig jobConfig,
        List<URL> commonPluginJars,
        boolean isStartWithSavePoint) {
    this.idGenerator = idGenerator;
    this.jobConfig = jobConfig;
    this.commonPluginJars = commonPluginJars;
    this.isStartWithSavePoint = isStartWithSavePoint;
    this.seaTunnelJobConfig = seaTunnelJobConfig;
    this.envOptions = ReadonlyConfig.fromConfig(seaTunnelJobConfig.getConfig("env"));
    this.fallbackParser =
            new JobConfigParser(idGenerator, commonPluginJars, this, isStartWithSavePoint);
}
|
当调用parse(null)方法时,会进行解析
 1
 2
 3
 4
 5
 6
 7
 8
 9
10
11
12
13
14
15
16
17
18
19
20
21
22
23
24
25
26
27
28
29
30
31
32
33
34
35
36
37
38
39
40
41
42
43
44
45
46
47
48
49
50
51
52
53
54
55
56
57
58
59
60
61
62
63
64
65
66
67
68
69
70
71
72
73
74
75
76
|
public ImmutablePair<List<Action>, Set<URL>> parse(ClassLoaderService classLoaderService) {
    // 将配置文件中的 env.jars添加到 commonJars中
    this.fillJobConfigAndCommonJars();
    // 从配置文件中,将source,transform,sink的配置分别读取处理
    List<? extends Config> sourceConfigs =
            TypesafeConfigUtils.getConfigList(
                    seaTunnelJobConfig, "source", Collections.emptyList());
    List<? extends Config> transformConfigs =
            TypesafeConfigUtils.getConfigList(
                    seaTunnelJobConfig, "transform", Collections.emptyList());
    List<? extends Config> sinkConfigs =
            TypesafeConfigUtils.getConfigList(
                    seaTunnelJobConfig, "sink", Collections.emptyList());
    // 获取连接器的jar包地址
    List<URL> connectorJars = getConnectorJarList(sourceConfigs, sinkConfigs);
    if (!commonPluginJars.isEmpty()) {
        // 将commonJars添加到连接器的jars中
        connectorJars.addAll(commonPluginJars);
    }
    ClassLoader parentClassLoader = Thread.currentThread().getContextClassLoader();

    ClassLoader classLoader;
    if (classLoaderService == null) {
        // 由于我们刚才传递了null,所以这里会创建SeaTunnelChildFirstClassLoader类加载器
        // 从名字也能看出,这里会与默认的加载器不同,不会先调用父类进行加载,
        // 而是自己找不到之后再调用父类进行加载,避免jar包冲突
        classLoader = new SeaTunnelChildFirstClassLoader(connectorJars, parentClassLoader);
    } else {
        classLoader =
                classLoaderService.getClassLoader(
                        Long.parseLong(jobConfig.getJobContext().getJobId()), connectorJars);
    }
    try {
        Thread.currentThread().setContextClassLoader(classLoader);
        // 检查DAG里面是否构成环,避免后续的构建过程陷入循环
        ConfigParserUtil.checkGraph(sourceConfigs, transformConfigs, sinkConfigs);
        LinkedHashMap<String, List<Tuple2<CatalogTable, Action>>> tableWithActionMap =
                new LinkedHashMap<>();

        log.info("start generating all sources.");
        for (int configIndex = 0; configIndex < sourceConfigs.size(); configIndex++) {
            Config sourceConfig = sourceConfigs.get(configIndex);
            // parseSource方法为真正生成source的方法
            // 返回值为2元组,第一个值为 当前source生成的表名称
            // 第二个值为 CatalogTable和Action的二元组列表
            // 由于SeaTunnel Source支持读取多表,所以第二个值为列表
            Tuple2<String, List<Tuple2<CatalogTable, Action>>> tuple2 =
                    parseSource(configIndex, sourceConfig, classLoader);
            tableWithActionMap.put(tuple2._1(), tuple2._2());
        }

        log.info("start generating all transforms.");
        // parseTransforms来生成transform
        // 这里将上面的 tableWithActionMap传递了进去,所以不需要返回值
        parseTransforms(transformConfigs, classLoader, tableWithActionMap);

        log.info("start generating all sinks.");
        List<Action> sinkActions = new ArrayList<>();
        for (int configIndex = 0; configIndex < sinkConfigs.size(); configIndex++) {
            Config sinkConfig = sinkConfigs.get(configIndex);
            // parseSink方法来生成sink
            // 同样,传递了tableWithActionMap
            sinkActions.addAll(
                    parseSink(configIndex, sinkConfig, classLoader, tableWithActionMap));
        }
        Set<URL> factoryUrls = getUsedFactoryUrls(sinkActions);
        return new ImmutablePair<>(sinkActions, factoryUrls);
    } finally {
        // 将当前线程的类加载器切换为原来的类加载器
        Thread.currentThread().setContextClassLoader(parentClassLoader);
        if (classLoaderService != null) {
            classLoaderService.releaseClassLoader(
                    Long.parseLong(jobConfig.getJobContext().getJobId()), connectorJars);
        }
    }
}
|
解析Source
先来看下parseSource方法
 1
 2
 3
 4
 5
 6
 7
 8
 9
10
11
12
13
14
15
16
17
18
19
20
21
22
23
24
25
26
27
28
29
30
31
32
33
34
35
36
37
38
39
40
41
42
43
44
45
46
47
48
49
50
|
public Tuple2<String, List<Tuple2<CatalogTable, Action>>> parseSource(
        int configIndex, Config sourceConfig, ClassLoader classLoader) {
    final ReadonlyConfig readonlyConfig = ReadonlyConfig.fromConfig(sourceConfig);
    // factoryId就是我们配置里面的 source名称,例如 FakeSource, Jdbc
    final String factoryId = getFactoryId(readonlyConfig);
    // 获取当前数据源生成的 表 名称,注意这里的表可能并不对应一个表
    // 由于 seatunnel source支持多表读取,那么这里就会出现一对多的关系
    final String tableId =
            readonlyConfig.getOptional(CommonOptions.RESULT_TABLE_NAME).orElse(DEFAULT_ID);
    // 获取并行度
    final int parallelism = getParallelism(readonlyConfig);

    // 这个地方是由于某些Source还不支持通过Factory工厂来构建,所以会有两种构建方法
    // 后续当所有连接器都支持通过工厂来创建后,这里的代码会被删除掉,所以这次忽略掉这部分代码
    // 方法内部是查询是否有相应的工厂类,相应的工厂类不存在时返回 true,不存在时返回false
    boolean fallback =
            isFallback(
                    classLoader,
                    TableSourceFactory.class,
                    factoryId,
                    (factory) -> factory.createSource(null));
    if (fallback) {
        Tuple2<CatalogTable, Action> tuple =
                fallbackParser.parseSource(sourceConfig, jobConfig, tableId, parallelism);
        return new Tuple2<>(tableId, Collections.singletonList(tuple));
    }
    // 通过FactoryUtil来创建Source
    // 返回对象为 SeaTunnelSource实例,以及List<CatalogTable>
    // 这里会创建我们同步任务中Source的实例,catalogtable列表表示这个数据源读取的表的表结构等信息
    Tuple2<SeaTunnelSource<Object, SourceSplit, Serializable>, List<CatalogTable>> tuple2 =
            FactoryUtil.createAndPrepareSource(readonlyConfig, classLoader, factoryId);
    // 获取当前source connector的jar包
    Set<URL> factoryUrls = new HashSet<>();
    factoryUrls.addAll(getSourcePluginJarPaths(sourceConfig));

    List<Tuple2<CatalogTable, Action>> actions = new ArrayList<>();
    long id = idGenerator.getNextId();
    String actionName = JobConfigParser.createSourceActionName(configIndex, factoryId);
    SeaTunnelSource<Object, SourceSplit, Serializable> source = tuple2._1();
    source.setJobContext(jobConfig.getJobContext());
    PluginUtil.ensureJobModeMatch(jobConfig.getJobContext(), source);
    // 构建 SourceAction
    SourceAction<Object, SourceSplit, Serializable> action =
            new SourceAction<>(id, actionName, tuple2._1(), factoryUrls, new HashSet<>());
    action.setParallelism(parallelism);
    for (CatalogTable catalogTable : tuple2._2()) {
        actions.add(new Tuple2<>(catalogTable, action));
    }
    return new Tuple2<>(tableId, actions);
}
|
看一下新版本中是如何通过工厂来创建Source实例的
 1
 2
 3
 4
 5
 6
 7
 8
 9
10
11
12
13
14
15
16
17
18
19
20
21
22
23
24
25
26
27
28
29
30
31
32
33
34
35
36
37
38
39
40
41
42
43
44
45
46
47
48
49
50
51
52
53
54
55
56
57
58
59
|
public static <T, SplitT extends SourceSplit, StateT extends Serializable>
        Tuple2<SeaTunnelSource<T, SplitT, StateT>, List<CatalogTable>> createAndPrepareSource(
                ReadonlyConfig options, ClassLoader classLoader, String factoryIdentifier) {

    try {
        // 通过SPI加载TableSourceFactory的类,然后根据factoryIdentifier找对应的类
        // 即 找到 souce对应的 SourceFactory
        final TableSourceFactory factory =
                discoverFactory(classLoader, TableSourceFactory.class, factoryIdentifier);
        // 通过Factory来创建Source实例,这个Source实例就是你任务中对应类型的Source
        // 也就是说Source类的初始化会在Client端创建一次,需要注意这里的环境是否能够连接到该Source
        SeaTunnelSource<T, SplitT, StateT> source =
                createAndPrepareSource(factory, options, classLoader);
        List<CatalogTable> catalogTables;
        try {
            // 获取 source会产生的表 列表。包含了字段,数据类型,分区信息等
            catalogTables = source.getProducedCatalogTables();
        } catch (UnsupportedOperationException e) {
            // 为了兼容有些Connector未实现getProducedCatalogTables方法
            // 调用老的获取数据类型的方法,并转换为Catalog
            SeaTunnelDataType<T> seaTunnelDataType = source.getProducedType();
            final String tableId =
                    options.getOptional(CommonOptions.RESULT_TABLE_NAME).orElse(DEFAULT_ID);
            catalogTables =
                    CatalogTableUtil.convertDataTypeToCatalogTables(seaTunnelDataType, tableId);
        }
        LOG.info(
                "get the CatalogTable from source {}: {}",
                source.getPluginName(),
                catalogTables.stream()
                        .map(CatalogTable::getTableId)
                        .map(TableIdentifier::toString)
                        .collect(Collectors.joining(",")));
        // 这个代码已经过时
        if (options.get(SourceOptions.DAG_PARSING_MODE) == ParsingMode.SHARDING) {
            CatalogTable catalogTable = catalogTables.get(0);
            catalogTables.clear();
            catalogTables.add(catalogTable);
        }
        return new Tuple2<>(source, catalogTables);
    } catch (Throwable t) {
        throw new FactoryException(
                String.format(
                        "Unable to create a source for identifier '%s'.", factoryIdentifier),
                t);
    }
}


private static <T, SplitT extends SourceSplit, StateT extends Serializable>
        SeaTunnelSource<T, SplitT, StateT> createAndPrepareSource(
                TableSourceFactory factory, ReadonlyConfig options, ClassLoader classLoader) {
                // 通过TableSourceFactory来创建Source
    TableSourceFactoryContext context = new TableSourceFactoryContext(options, classLoader);
    ConfigValidator.of(context.getOptions()).validate(factory.optionRule());
    TableSource<T, SplitT, StateT> tableSource = factory.createSource(context);
    return tableSource.createSource();
}
|
在客户端就会通过SPI加载到Source相应的Factory然后创建出对应的Source实例出来,所以这里需要保证提交的客户端也能够与Source/Sink端建立连接,避免网络连不通的问题。
接下来在看一下如何创建Transform
 1
 2
 3
 4
 5
 6
 7
 8
 9
10
11
12
13
14
15
16
17
18
19
20
21
22
23
24
25
26
27
28
29
30
31
32
33
34
35
36
37
38
39
40
41
42
43
44
45
46
47
48
49
50
51
52
53
54
55
56
57
58
59
60
61
62
63
64
65
66
67
68
69
70
71
72
73
74
75
76
77
78
79
80
81
82
83
84
85
86
87
88
89
90
91
92
93
94
|
public void parseTransforms(
        List<? extends Config> transformConfigs,
        ClassLoader classLoader,
        LinkedHashMap<String, List<Tuple2<CatalogTable, Action>>> tableWithActionMap) {
    if (CollectionUtils.isEmpty(transformConfigs) || transformConfigs.isEmpty()) {
        return;
    }
    Queue<Config> configList = new LinkedList<>(transformConfigs);
    int index = 0;
    while (!configList.isEmpty()) {
        parseTransform(index++, configList, classLoader, tableWithActionMap);
    }
}

private void parseTransform(
        int index,
        Queue<Config> transforms,
        ClassLoader classLoader,
        LinkedHashMap<String, List<Tuple2<CatalogTable, Action>>> tableWithActionMap) {
    Config config = transforms.poll();
    final ReadonlyConfig readonlyConfig = ReadonlyConfig.fromConfig(config);
    final String factoryId = getFactoryId(readonlyConfig);
    // get jar urls
    Set<URL> jarUrls = new HashSet<>();
    jarUrls.addAll(getTransformPluginJarPaths(config));
    final List<String> inputIds = getInputIds(readonlyConfig);
    // inputIds为source_table_name,根据这个值找到所依赖的上游source
    // 目前Transform不支持对多表进行处理,所以如果所依赖的上游是多表,会抛出异常
    List<Tuple2<CatalogTable, Action>> inputs =
            inputIds.stream()
                    .map(tableWithActionMap::get)
                    .filter(Objects::nonNull)
                    .peek(
                            input -> {
                                if (input.size() > 1) {
                                    throw new JobDefineCheckException(
                                            "Adding transform to multi-table source is not supported.");
                                }
                            })
                    .flatMap(Collection::stream)
                    .collect(Collectors.toList());
    // inputs为空,表明当前Transform节点找不到任何上游的节点
    // 此时会有几种情况
    if (inputs.isEmpty()) {

        if (transforms.isEmpty()) {
            // 未设置source_table_name,设置结果与之前不对应并且只有一个transform时
            // 把最后一个source作为这个transform的上游表
            inputs = findLast(tableWithActionMap);
        } else {
            // 所依赖的transform可能还没有创建,将本次的transform再放回队列中,后续再进行解析
            transforms.offer(config);
            return;
        }
    }
    // 这次transform结果产生的表名称
    final String tableId =
            readonlyConfig.getOptional(CommonOptions.RESULT_TABLE_NAME).orElse(DEFAULT_ID);
    // 获取上游source的Action
    Set<Action> inputActions =
            inputs.stream()
                    .map(Tuple2::_2)
                    .collect(Collectors.toCollection(LinkedHashSet::new));
    // 验证所依赖的多个上游,是否产生的表结构都相同,只有所有的表结构都相同才能进入一个transform来处理
    checkProducedTypeEquals(inputActions);
    // 设置并行度
    int spareParallelism = inputs.get(0)._2().getParallelism();
    int parallelism =
            readonlyConfig.getOptional(CommonOptions.PARALLELISM).orElse(spareParallelism);
    // 创建Transform实例,与刚刚通过Source工厂来创建差不多的行为
    CatalogTable catalogTable = inputs.get(0)._1();
    SeaTunnelTransform<?> transform =
            FactoryUtil.createAndPrepareTransform(
                    catalogTable, readonlyConfig, classLoader, factoryId);
    transform.setJobContext(jobConfig.getJobContext());
    long id = idGenerator.getNextId();
    String actionName = JobConfigParser.createTransformActionName(index, factoryId);
    // 封装成Action
    TransformAction transformAction =
            new TransformAction(
                    id,
                    actionName,
                    new ArrayList<>(inputActions),
                    transform,
                    jarUrls,
                    new HashSet<>());
    transformAction.setParallelism(parallelism);
    // 放入到map中,此时map里面存储了source和transform
    // 以每个节点产生的表结构为key,action作为value
    tableWithActionMap.put(
            tableId,
            Collections.singletonList(
                    new Tuple2<>(transform.getProducedCatalogTable(), transformAction)));
}
|
解析Sink
当看完source/transform的解析之后,对于sink的解析逻辑也会比较明了
  1
  2
  3
  4
  5
  6
  7
  8
  9
 10
 11
 12
 13
 14
 15
 16
 17
 18
 19
 20
 21
 22
 23
 24
 25
 26
 27
 28
 29
 30
 31
 32
 33
 34
 35
 36
 37
 38
 39
 40
 41
 42
 43
 44
 45
 46
 47
 48
 49
 50
 51
 52
 53
 54
 55
 56
 57
 58
 59
 60
 61
 62
 63
 64
 65
 66
 67
 68
 69
 70
 71
 72
 73
 74
 75
 76
 77
 78
 79
 80
 81
 82
 83
 84
 85
 86
 87
 88
 89
 90
 91
 92
 93
 94
 95
 96
 97
 98
 99
100
|
public List<SinkAction<?, ?, ?, ?>> parseSink(
        int configIndex,
        Config sinkConfig,
        ClassLoader classLoader,
        LinkedHashMap<String, List<Tuple2<CatalogTable, Action>>> tableWithActionMap) {

    ReadonlyConfig readonlyConfig = ReadonlyConfig.fromConfig(sinkConfig);
    //
    String factoryId = getFactoryId(readonlyConfig);
    // 获取当前sink节点依赖的上游节点
    List<String> inputIds = getInputIds(readonlyConfig);
    // 在tableWithActionMap中查找
    List<List<Tuple2<CatalogTable, Action>>> inputVertices =
            inputIds.stream()
                    .map(tableWithActionMap::get)
                    .filter(Objects::nonNull)
                    .collect(Collectors.toList());
     // 当sink节点找不到上游节点时,找到最后一个节点信息作为上游节点
     // 这里与transform不一样的地方是,不会再等其他sink节点初始化完成,因为sink节点不可能依赖与其他sink节点
    if (inputVertices.isEmpty()) {
        // Tolerates incorrect configuration of simple graph
        inputVertices = Collections.singletonList(findLast(tableWithActionMap));
    } else if (inputVertices.size() > 1) {
        for (List<Tuple2<CatalogTable, Action>> inputVertex : inputVertices) {
            if (inputVertex.size() > 1) {
            // 当一个sink节点即有多个上游节点,且某个上游节点还会产生多表时抛出异常
            // sink可以支持多个数据源,或者单个数据源下产生多表,不能同时支持多个数据源,且某个数据源下存在多表
                throw new JobDefineCheckException(
                        "Sink don't support simultaneous writing of data from multi-table source and other sources.");
            }
        }
    }
    // 与解析source一样,对老代码的兼容
    boolean fallback =
            isFallback(
                    classLoader,
                    TableSinkFactory.class,
                    factoryId,
                    (factory) -> factory.createSink(null));
    if (fallback) {
        return fallbackParser.parseSinks(configIndex, inputVertices, sinkConfig, jobConfig);
    }

    // 获取sink的连接器jar包
    Set<URL> jarUrls = new HashSet<>();
    jarUrls.addAll(getSinkPluginJarPaths(sinkConfig));
    List<SinkAction<?, ?, ?, ?>> sinkActions = new ArrayList<>();

    // 多个数据源的情况
    if (inputVertices.size() > 1) {
        Set<Action> inputActions =
                inputVertices.stream()
                        .flatMap(Collection::stream)
                        .map(Tuple2::_2)
                        .collect(Collectors.toCollection(LinkedHashSet::new));
        // 检查多个上游数据源产生的表结构是否一致
        checkProducedTypeEquals(inputActions);
        // 创建sinkAction
        Tuple2<CatalogTable, Action> inputActionSample = inputVertices.get(0).get(0);
        SinkAction<?, ?, ?, ?> sinkAction =
                createSinkAction(
                        inputActionSample._1(),
                        inputActions,
                        readonlyConfig,
                        classLoader,
                        jarUrls,
                        new HashSet<>(),
                        factoryId,
                        inputActionSample._2().getParallelism(),
                        configIndex);
        sinkActions.add(sinkAction);
        return sinkActions;
    }

    // 此时只有一个数据源,且此数据源下可能会产生多表,循环创建sinkAction
    for (Tuple2<CatalogTable, Action> tuple : inputVertices.get(0)) {
        SinkAction<?, ?, ?, ?> sinkAction =
                createSinkAction(
                        tuple._1(),
                        Collections.singleton(tuple._2()),
                        readonlyConfig,
                        classLoader,
                        jarUrls,
                        new HashSet<>(),
                        factoryId,
                        tuple._2().getParallelism(),
                        configIndex);
        sinkActions.add(sinkAction);
    }
    // 当一个数据源下多表时与多个数据源 会多进行这么这一步
    // 上面的createSinkAction是一致的
    // 此方法内会判断sink是否支持多表,以及
    Optional<SinkAction<?, ?, ?, ?>> multiTableSink =
            tryGenerateMultiTableSink(
                    sinkActions, readonlyConfig, classLoader, factoryId, configIndex);
    // 最终会将所创建的sink action作为返回值返回
    return multiTableSink
            .<List<SinkAction<?, ?, ?, ?>>>map(Collections::singletonList)
            .orElse(sinkActions);
}
|
接下来看下创建sinkAction方法
 1
 2
 3
 4
 5
 6
 7
 8
 9
10
11
12
13
14
15
16
17
18
19
20
21
22
23
24
25
26
27
28
29
30
31
32
33
34
35
36
37
38
39
40
41
42
43
44
45
46
47
48
49
50
51
52
53
54
55
56
57
58
59
60
61
62
63
64
|
private SinkAction<?, ?, ?, ?> createSinkAction(
        CatalogTable catalogTable,
        Set<Action> inputActions,
        ReadonlyConfig readonlyConfig,
        ClassLoader classLoader,
        Set<URL> factoryUrls,
        Set<ConnectorJarIdentifier> connectorJarIdentifiers,
        String factoryId,
        int parallelism,
        int configIndex) {
    // 使用工厂类创建sink
    SeaTunnelSink<?, ?, ?, ?> sink =
            FactoryUtil.createAndPrepareSink(
                    catalogTable, readonlyConfig, classLoader, factoryId);
    sink.setJobContext(jobConfig.getJobContext());
    SinkConfig actionConfig =
            new SinkConfig(catalogTable.getTableId().toTablePath().toString());
    long id = idGenerator.getNextId();
    String actionName =
            JobConfigParser.createSinkActionName(
                    configIndex, factoryId, actionConfig.getMultipleRowTableId());
    // 创建sinkAction
    SinkAction<?, ?, ?, ?> sinkAction =
            new SinkAction<>(
                    id,
                    actionName,
                    new ArrayList<>(inputActions),
                    sink,
                    factoryUrls,
                    connectorJarIdentifiers,
                    actionConfig);
    if (!isStartWithSavePoint) {
    // 这里需要注意,当非从savepoint启动时,会进行savemode的处理
        handleSaveMode(sink);
    }
    sinkAction.setParallelism(parallelism);
    return sinkAction;
}

public void handleSaveMode(SeaTunnelSink<?, ?, ?, ?> sink) {
// 当sink类支持了savemode特性时,会进行savemode处理
// 例如删除表,重建表,报错等
    if (SupportSaveMode.class.isAssignableFrom(sink.getClass())) {
        SupportSaveMode saveModeSink = (SupportSaveMode) sink;
        // 当 设置savemode在client端执行时,会在client端去做这些事
        // 我们之前出现过一个错误是当在客户端执行完毕后,到集群后任务执行出错,卡在scheduling的状态
        // 导致数据被清空后没有及时写入
        // 以及需要注意这个地方执行的机器到sink集群的网络是否能够连通,推荐将这个行为放到server端执行
        if (envOptions
                .get(EnvCommonOptions.SAVEMODE_EXECUTE_LOCATION)
                .equals(SaveModeExecuteLocation.CLIENT)) {
            log.warn(
                    "SaveMode execute location on CLIENT is deprecated, please use CLUSTER instead.");
            Optional<SaveModeHandler> saveModeHandler = saveModeSink.getSaveModeHandler();
            if (saveModeHandler.isPresent()) {
                try (SaveModeHandler handler = saveModeHandler.get()) {
                    new SaveModeExecuteWrapper(handler).execute();
                } catch (Exception e) {
                    throw new SeaTunnelRuntimeException(HANDLE_SAVE_MODE_FAILED, e);
                }
            }
        }
    }
}
|
我们看完了如何去解析Source/Transform/Sink的逻辑,再回到调用的地方
 1
 2
 3
 4
 5
 6
 7
 8
 9
10
|
    List<Action> sinkActions = new ArrayList<>();
    for (int configIndex = 0; configIndex < sinkConfigs.size(); configIndex++) {
        Config sinkConfig = sinkConfigs.get(configIndex);
        // parseSink方法来生成sink
        // 同样,传递了tableWithActionMap
        sinkActions.addAll(
                parseSink(configIndex, sinkConfig, classLoader, tableWithActionMap));
    }
    Set<URL> factoryUrls = getUsedFactoryUrls(sinkActions);
    return new ImmutablePair<>(sinkActions, factoryUrls);
|
parseSink会返回所有创建的Sink Action,而每个Action都维护了upstream Action,所以我们能通过最终的Sink Action找到相关联的Transform Action和Source Action
最终调用getUsedFactoryUrls或找到此链路上的所有依赖的Jar
然后返回一个二元组
逻辑计划解析
再回到逻辑计划生成的部分
1
2
3
4
5
6
7
|
public LogicalDag getLogicalDag() {
    //
    ImmutablePair<List<Action>, Set<URL>> immutablePair = getJobConfigParser().parse(null);
    actions.addAll(immutablePair.getLeft());
    ....
    return getLogicalDagGenerator().generate();
}
|
在上面看完了如何去解析配置,接下来看下如何去生成逻辑计划
 1
 2
 3
 4
 5
 6
 7
 8
 9
10
11
12
13
14
15
16
17
18
|
// 初始化将我们生成的所有SinkAction传入
protected LogicalDagGenerator getLogicalDagGenerator() {
    return new LogicalDagGenerator(actions, jobConfig, idGenerator, isStartWithSavePoint);
}


public LogicalDag generate() {
    // 根据action来生成节点信息
    actions.forEach(this::createLogicalVertex);
    // 创建边
    Set<LogicalEdge> logicalEdges = createLogicalEdges();
    // 构建LogicalDag对象,并将解析的值设置到相应属性中
    LogicalDag logicalDag = new LogicalDag(jobConfig, idGenerator);
    logicalDag.getEdges().addAll(logicalEdges);
    logicalDag.getLogicalVertexMap().putAll(logicalVertexMap);
    logicalDag.setStartWithSavePoint(isStartWithSavePoint);
    return logicalDag;
}
|
创建逻辑计划节点
 1
 2
 3
 4
 5
 6
 7
 8
 9
10
11
12
13
14
15
16
17
18
19
20
21
22
23
24
25
26
27
28
29
30
31
32
33
34
35
36
37
38
39
40
41
42
43
44
45
46
|
private void createLogicalVertex(Action action) {
    // 获取当前action的id,判断当map中已经存在则返回
    final Long logicalVertexId = action.getId();
    if (logicalVertexMap.containsKey(logicalVertexId)) {
        return;
    }
    // 对上游的依赖进行循环创建
    // map对象的存储结构为:
    // 当前节点的id为key
    // value为一个list,存储下游使用到该节点的id编号
    action.getUpstream()
            .forEach(
                    inputAction -> {
                        createLogicalVertex(inputAction);
                        inputVerticesMap
                                .computeIfAbsent(
                                        inputAction.getId(), id -> new LinkedHashSet<>())
                                .add(logicalVertexId);
                    });
    // 最后创建当前节点的信息
    final LogicalVertex logicalVertex =
            new LogicalVertex(logicalVertexId, action, action.getParallelism());
    // 注意这里有两个map
    // 一个为inputVerticesMap,一个为logicalVertexMap
    // inputVerticesMap中存储了节点之间的关系
    // logicalVertexMap存储了节点编号与节点的关系
    logicalVertexMap.put(logicalVertexId, logicalVertex);
}


private Set<LogicalEdge> createLogicalEdges() {
    // 使用上面创建的两个map来创建边
    return inputVerticesMap.entrySet().stream()
            .map(
                    entry ->
                            entry.getValue().stream()
                                    .map(
                                            targetId ->
                                                    new LogicalEdge(
                                                            logicalVertexMap.get(
                                                                    entry.getKey()),
                                                            logicalVertexMap.get(targetId)))
                                    .collect(Collectors.toList()))
            .flatMap(Collection::stream)
            .collect(Collectors.toCollection(LinkedHashSet::new));
}
|

上面的配置中,会根据上下游关系生成这样的逻辑计划图,并且由于Fake2节点是没有任务下游的,并不会计入到逻辑计划中
小结一下
至此我们看完了在客户端如何完成一个任务的提交流程
小结一下:
- 首先会判断我们执行的模式,当我们是local模式时,会在本机创建一个server节点
- 然后在当前节点创建一个hazelcast节点,与hazelcast集群进行连接,连接到集群或者刚刚启动的本地节点
- 接下来判断我们这次的任务类型来调用不同的方法
- 以提交任务为例,会解析配置文件,并进行逻辑计划解析,在逻辑计划解析时,会在提交的机器上创建Source/Transform/Sink实例。并且去执行savemode功能,有可能会建表,重建表,删除数据操作(当启用客户端执行时)
- 当逻辑计划解析完成后,会将信息编码,然后通过hazelcast的集群通信功能,将信息发送给server的master节点
- 发送完成后,根据配置决定退出还是继续做任务状态的检测
- 程序添加hook配置,当客户端退出后取消刚刚提交的任务
服务端提交任务相关
我们再回顾一下当服务端启动后会执行的组件:
- coordinatorService
仅在master/standby节点启用,会监听集群状态,主备切换
- SlotService
在worker节点中启用,会定期上报自身信息到master中
- TaskExecutionSerive
在worker节点中启用,会定时更新执行的任务指标到IMAP中
在集群未接收到任何任务时,会运行这些组件,当Client发送一条SeaTunnelSubmitJobCodec信息到服务端后,服务端又是如何处理的呢?
接收消息
因为客户端与服务端在不同的机器上,所有这里无法使用方法调用,而是使用了消息传递,当服务端接收到一条消息后是如何进行相关的方法调用的呢
首先我们在上面的代码中,知道客户端向服务端发送的是一条类型为SeaTunnelSubmitJobCodec的消息
 1
 2
 3
 4
 5
 6
 7
 8
 9
10
|
// 客户端相关代码
ClientMessage request =
        SeaTunnelSubmitJobCodec.encodeRequest(
                jobImmutableInformation.getJobId(),
                seaTunnelHazelcastClient
                        .getSerializationService()
                        .toData(jobImmutableInformation),
                jobImmutableInformation.isStartWithSavePoint());
PassiveCompletableFuture<Void> submitJobFuture =
        seaTunnelHazelcastClient.requestOnMasterAndGetCompletableFuture(request);
|
我们进入SeaTunnelSubmitJobCodec这个类,查看他的相关调用类,可以找到一个SeaTunnelMessageTaskFactoryProvider的类,在这个里中维护了一个消息类型到MessageTask的映射关系,也可以理解为客户端消息到服务端调用类的映射关系,以SeaTunnelSubmitJobCodec为例,会返回SubmitJobTask这个类
 1
 2
 3
 4
 5
 6
 7
 8
 9
10
11
12
|
private final Int2ObjectHashMap<MessageTaskFactory> factories = new Int2ObjectHashMap<>(60);

private void initFactories() {
    factories.put(
            SeaTunnelPrintMessageCodec.REQUEST_MESSAGE_TYPE,
            (clientMessage, connection) ->
                    new PrintMessageTask(clientMessage, node, connection));
    factories.put(
            SeaTunnelSubmitJobCodec.REQUEST_MESSAGE_TYPE,
            (clientMessage, connection) -> new SubmitJobTask(clientMessage, node, connection));
    .....
}
|
当我们查看SubmitJobTask这个类时,又会发现继续调用了SubmitJobOperation这个类
1
2
3
4
5
6
7
|
@Override
protected Operation prepareOperation() {
    return new SubmitJobOperation(
            parameters.jobId,
            parameters.jobImmutableInformation,
            parameters.isStartWithSavePoint);
}
|
在SubmitJobOperation中我们可以看到真正调用的地方,将我们的信息交给了CoordinatorService组件,调用了其submitJob方法
1
2
3
4
5
6
7
8
|
@Override
protected PassiveCompletableFuture<?> doRun() throws Exception {
    SeaTunnelServer seaTunnelServer = getService();
    return seaTunnelServer
            .getCoordinatorService()
            .submitJob(jobId, jobImmutableInformation, isStartWithSavePoint);
}
|
这时一个客户端的消息就真正的被交给服务端来进行方法调用了,至于其他类型的操作也都可以类似找到相关的类,就不再赘述。
CoordinatorService
接下来看下在CoordinatorService是如何进行任务提交的
 1
 2
 3
 4
 5
 6
 7
 8
 9
10
11
12
13
14
15
16
17
18
19
20
21
22
23
24
25
26
27
28
29
30
31
32
33
34
35
36
37
38
39
40
41
42
43
44
45
46
47
48
49
50
51
52
53
54
55
56
57
58
59
60
61
62
63
64
65
66
67
68
69
70
71
72
73
74
75
|
public PassiveCompletableFuture<Void> submitJob(
        long jobId, Data jobImmutableInformation, boolean isStartWithSavePoint) {
    CompletableFuture<Void> jobSubmitFuture = new CompletableFuture<>();

    // 首先会根据任务id来判断,当存在相同任务的id时,直接返回
    if (getJobMaster(jobId) != null) {
        logger.warning(
                String.format(
                        "The job %s is currently running; no need to submit again.", jobId));
        jobSubmitFuture.complete(null);
        return new PassiveCompletableFuture<>(jobSubmitFuture);
    }
    // 初始化JobMaster对象
    JobMaster jobMaster =
            new JobMaster(
                    jobImmutableInformation,
                    this.nodeEngine,
                    executorService,
                    getResourceManager(),
                    getJobHistoryService(),
                    runningJobStateIMap,
                    runningJobStateTimestampsIMap,
                    ownedSlotProfilesIMap,
                    runningJobInfoIMap,
                    metricsImap,
                    engineConfig,
                    seaTunnelServer);
    //
    executorService.submit(
            () -> {
                try {
                // 由于2.3.6中任务id可以由用户传递,而在seatunnel中会根据任务id来做一些状态判断
                // 所以这里的检查是保证在当前的状态中,不会存在相同id的任务
                    if (!isStartWithSavePoint
                            && getJobHistoryService().getJobMetrics(jobId) != null) {
                        throw new JobException(
                                String.format(
                                        "The job id %s has already been submitted and is not starting with a savepoint.",
                                        jobId));
                    }
                    // 将当前任务的信息添加到IMAP中
                    runningJobInfoIMap.put(
                            jobId,
                            new JobInfo(System.currentTimeMillis(), jobImmutableInformation));
                    runningJobMasterMap.put(jobId, jobMaster);
                    // 对JobMaster做初始化操作
                    jobMaster.init(
                            runningJobInfoIMap.get(jobId).getInitializationTimestamp(), false);
                    // 当jobMaster初始化完成后,会认为任务创建成功
                    jobSubmitFuture.complete(null);
                } catch (Throwable e) {
                    String errorMsg = ExceptionUtils.getMessage(e);
                    logger.severe(String.format("submit job %s error %s ", jobId, errorMsg));
                    jobSubmitFuture.completeExceptionally(new JobException(errorMsg));
                }
                if (!jobSubmitFuture.isCompletedExceptionally()) {
                // 当任务正常提交后,调用jobMaster的run方法开始执行任务
                // 以及最后会检查任务状态,从内部状态中将此次任务信息删除
                    try {
                        jobMaster.run();
                    } finally {
                        // voidCompletableFuture will be cancelled when zeta master node
                        // shutdown to simulate master failure,
                        // don't update runningJobMasterMap is this case.
                        if (!jobMaster.getJobMasterCompleteFuture().isCancelled()) {
                            runningJobMasterMap.remove(jobId);
                        }
                    }
                } else {
                    runningJobInfoIMap.remove(jobId);
                    runningJobMasterMap.remove(jobId);
                }
            });
    return new PassiveCompletableFuture<>(jobSubmitFuture);
}
|
可以看到在服务端,会通过创建一个JobMaster对象,由这个对象来进行单个任务的管理。
在创建JobMaster对象时,会通过getResourceManager方法来获取资源管理对象,以及通过getJobHistoryService方法获取任务历史信息,jobHistoryService在启动时就会创建完成,ResourceManage则采用了懒加载的方式,在第一次有任务提交之后才会进行创建
 1
 2
 3
 4
 5
 6
 7
 8
 9
10
11
12
13
14
15
|
/** Lazy load for resource manager */
public ResourceManager getResourceManager() {
    if (resourceManager == null) {
        synchronized (this) {
            if (resourceManager == null) {
                ResourceManager manager =
                        new ResourceManagerFactory(nodeEngine, engineConfig)
                                .getResourceManager();
                manager.init();
                resourceManager = manager;
            }
        }
    }
    return resourceManager;
}
|
ResourceManager
目前seatunnel也仅支持standalone的部署方式,当初始化ResourceManager时,会获取到集群所有节点,然后向其发送SyncWorkerProfileOperation操作来获取节点的信息,然后更新到内部的registerWorker状态中
 1
 2
 3
 4
 5
 6
 7
 8
 9
10
11
12
13
14
15
16
17
18
19
20
21
22
23
24
25
26
27
28
29
30
31
32
33
34
|
@Override
public void init() {
    log.info("Init ResourceManager");
    initWorker();
}

private void initWorker() {
    log.info("initWorker... ");
    List<Address> aliveNode =
            nodeEngine.getClusterService().getMembers().stream()
                    .map(Member::getAddress)
                    .collect(Collectors.toList());
    log.info("init live nodes: {}", aliveNode);
    List<CompletableFuture<Void>> futures =
            aliveNode.stream()
                    .map(
                            node ->
                                    sendToMember(new SyncWorkerProfileOperation(), node)
                                            .thenAccept(
                                                    p -> {
                                                        if (p != null) {
                                                            registerWorker.put(
                                                                    node, (WorkerProfile) p);
                                                            log.info(
                                                                    "received new worker register: "
                                                                            + ((WorkerProfile)
                                                                                            p)
                                                                                    .getAddress());
                                                        }
                                                    }))
                    .collect(Collectors.toList());
    futures.forEach(CompletableFuture::join);
    log.info("registerWorker: {}", registerWorker);
}
|
而我们之前在SlotService中注意到在每个节点会定时向master发送心跳信息,心跳信息里面包含了当前节点的状态,在ResourceManager中当接收到心跳信息后,也会在内部状态中更新每个节点的状态
 1
 2
 3
 4
 5
 6
 7
 8
 9
10
|
@Override
public void heartbeat(WorkerProfile workerProfile) {
    if (!registerWorker.containsKey(workerProfile.getAddress())) {
        log.info("received new worker register: " + workerProfile.getAddress());
        sendToMember(new ResetResourceOperation(), workerProfile.getAddress()).join();
    } else {
        log.debug("received worker heartbeat from: " + workerProfile.getAddress());
    }
    registerWorker.put(workerProfile.getAddress(), workerProfile);
}
|
JobMaster
在CoordinatorService中会创建JobMaster并调用其init方法,当init方法完成后会认为任务创建成功。然后再调用run方法来正式运行任务
我们看一下初始化以及init方法。
 1
 2
 3
 4
 5
 6
 7
 8
 9
10
11
12
13
14
15
16
17
18
19
20
21
22
23
24
25
26
27
28
29
30
31
|
public JobMaster(
        @NonNull Data jobImmutableInformationData,
        @NonNull NodeEngine nodeEngine,
        @NonNull ExecutorService executorService,
        @NonNull ResourceManager resourceManager,
        @NonNull JobHistoryService jobHistoryService,
        @NonNull IMap runningJobStateIMap,
        @NonNull IMap runningJobStateTimestampsIMap,
        @NonNull IMap ownedSlotProfilesIMap,
        @NonNull IMap<Long, JobInfo> runningJobInfoIMap,
        @NonNull IMap<Long, HashMap<TaskLocation, SeaTunnelMetricsContext>> metricsImap,
        EngineConfig engineConfig,
        SeaTunnelServer seaTunnelServer) {
    this.jobImmutableInformationData = jobImmutableInformationData;
    this.nodeEngine = nodeEngine;
    this.executorService = executorService;
    flakeIdGenerator =
            this.nodeEngine
                    .getHazelcastInstance()
                    .getFlakeIdGenerator(Constant.SEATUNNEL_ID_GENERATOR_NAME);
    this.ownedSlotProfilesIMap = ownedSlotProfilesIMap;
    this.resourceManager = resourceManager;
    this.jobHistoryService = jobHistoryService;
    this.runningJobStateIMap = runningJobStateIMap;
    this.runningJobStateTimestampsIMap = runningJobStateTimestampsIMap;
    this.runningJobInfoIMap = runningJobInfoIMap;
    this.engineConfig = engineConfig;
    this.metricsImap = metricsImap;
    this.seaTunnelServer = seaTunnelServer;
    this.releasedSlotWhenTaskGroupFinished = new ConcurrentHashMap<>();
}
|
在初始化时只是进行简单的变量赋值,并没有进行什么操作,我们需要着重看下init方法
 1
 2
 3
 4
 5
 6
 7
 8
 9
10
11
12
13
14
15
16
17
18
19
20
21
22
23
24
25
26
27
28
29
30
31
32
33
34
35
36
37
38
39
40
41
42
43
44
45
46
47
48
49
50
51
52
53
54
55
56
57
58
59
60
61
62
63
64
65
66
67
68
69
70
71
72
73
74
75
76
77
78
79
80
81
82
83
84
85
86
87
88
89
90
|
public synchronized void init(long initializationTimestamp, boolean restart) throws Exception {
     // 服务端接收到客户端传递过来的消息是一个二进制的对象
     // 首先将其转换为JobImmutableInformation对象,而这个对象也正是客户端发送给服务端的对象
    jobImmutableInformation =
            nodeEngine.getSerializationService().toObject(jobImmutableInformationData);
    // 获取checkpoint的相关配置,例如周期,超时时间等
    jobCheckpointConfig =
            createJobCheckpointConfig(
                    engineConfig.getCheckpointConfig(), jobImmutableInformation.getJobConfig());

    LOGGER.info(
            String.format(
                    "Init JobMaster for Job %s (%s) ",
                    jobImmutableInformation.getJobConfig().getName(),
                    jobImmutableInformation.getJobId()));
    LOGGER.info(
            String.format(
                    "Job %s (%s) needed jar urls %s",
                    jobImmutableInformation.getJobConfig().getName(),
                    jobImmutableInformation.getJobId(),
                    jobImmutableInformation.getPluginJarsUrls()));
    ClassLoader appClassLoader = Thread.currentThread().getContextClassLoader();
    // 获取ClassLoader
    ClassLoader classLoader =
            seaTunnelServer
                    .getClassLoaderService()
                    .getClassLoader(
                            jobImmutableInformation.getJobId(),
                            jobImmutableInformation.getPluginJarsUrls());
    // 将客户端传递的信息反序列化为逻辑计划
    logicalDag =
            CustomClassLoadedObject.deserializeWithCustomClassLoader(
                    nodeEngine.getSerializationService(),
                    classLoader,
                    jobImmutableInformation.getLogicalDag());
    try {
        Thread.currentThread().setContextClassLoader(classLoader);
        // 在服务端会执行savemode的功能,例如对表进行创建,删除操作。
        if (!restart
                && !logicalDag.isStartWithSavePoint()
                && ReadonlyConfig.fromMap(logicalDag.getJobConfig().getEnvOptions())
                        .get(EnvCommonOptions.SAVEMODE_EXECUTE_LOCATION)
                        .equals(SaveModeExecuteLocation.CLUSTER)) {
            logicalDag.getLogicalVertexMap().values().stream()
                    .map(LogicalVertex::getAction)
                    .filter(action -> action instanceof SinkAction)
                    .map(sink -> ((SinkAction<?, ?, ?, ?>) sink).getSink())
                    .forEach(JobMaster::handleSaveMode);
        }
        // 逻辑计划到物理计划的解析
        final Tuple2<PhysicalPlan, Map<Integer, CheckpointPlan>> planTuple =
                PlanUtils.fromLogicalDAG(
                        logicalDag,
                        nodeEngine,
                        jobImmutableInformation,
                        initializationTimestamp,
                        executorService,
                        flakeIdGenerator,
                        runningJobStateIMap,
                        runningJobStateTimestampsIMap,
                        engineConfig.getQueueType(),
                        engineConfig);
        this.physicalPlan = planTuple.f0();
        this.physicalPlan.setJobMaster(this);
        this.checkpointPlanMap = planTuple.f1();
    } finally {
        // 重置当前线程的ClassLoader,并且释放上面创建的classLoader
        Thread.currentThread().setContextClassLoader(appClassLoader);
        seaTunnelServer
                .getClassLoaderService()
                .releaseClassLoader(
                        jobImmutableInformation.getJobId(),
                        jobImmutableInformation.getPluginJarsUrls());
    }
    Exception initException = null;
    try {
    // 初始化checkpointManager
        this.initCheckPointManager(restart);
    } catch (Exception e) {
        initException = e;
    }
    // 添加一些回调函数做任务状态监听
    this.initStateFuture();
    if (initException != null) {
        if (restart) {
            cancelJob();
        }
        throw initException;
    }
}
|
最后再看下run方法
 1
 2
 3
 4
 5
 6
 7
 8
 9
10
11
12
13
14
15
16
17
18
19
20
21
22
|
public void run() {
    try {
        physicalPlan.startJob();
    } catch (Throwable e) {
        LOGGER.severe(
                String.format(
                        "Job %s (%s) run error with: %s",
                        physicalPlan.getJobImmutableInformation().getJobConfig().getName(),
                        physicalPlan.getJobImmutableInformation().getJobId(),
                        ExceptionUtils.getMessage(e)));
    } finally {
        jobMasterCompleteFuture.join();
        if (engineConfig.getConnectorJarStorageConfig().getEnable()) {
            List<ConnectorJarIdentifier> pluginJarIdentifiers =
                    jobImmutableInformation.getPluginJarIdentifiers();
            seaTunnelServer
                    .getConnectorPackageService()
                    .cleanUpWhenJobFinished(
                            jobImmutableInformation.getJobId(), pluginJarIdentifiers);
        }
    }
}
|
此方法比较简单,调用physicalPlan.startJob()对生成的物理计划调用run方法
通过以上代码可以看出,当服务端接收到客户端提交任务请求后,会初始化JobMaster类,在JobMaster中完成了从逻辑计划到物理计划的生成,最终执行生成的物理计划。
下面需要深入看下如何从逻辑计划生成物理计划
逻辑计划到物理计划
物理计划的生成是由JobMaster中调用生成的
 1
 2
 3
 4
 5
 6
 7
 8
 9
10
11
12
|
final Tuple2<PhysicalPlan, Map<Integer, CheckpointPlan>> planTuple =
        PlanUtils.fromLogicalDAG(
                logicalDag,
                nodeEngine,
                jobImmutableInformation,
                initializationTimestamp,
                executorService,
                flakeIdGenerator,
                runningJobStateIMap,
                runningJobStateTimestampsIMap,
                engineConfig.getQueueType(),
                engineConfig);
|
在生成的方法中可以看到中间会先从逻辑计划生成执行计划,然后再由执行计划生成物理计划
 1
 2
 3
 4
 5
 6
 7
 8
 9
10
11
12
13
14
15
16
17
18
19
20
21
22
23
24
25
|
public static Tuple2<PhysicalPlan, Map<Integer, CheckpointPlan>> fromLogicalDAG(
        @NonNull LogicalDag logicalDag,
        @NonNull NodeEngine nodeEngine,
        @NonNull JobImmutableInformation jobImmutableInformation,
        long initializationTimestamp,
        @NonNull ExecutorService executorService,
        @NonNull FlakeIdGenerator flakeIdGenerator,
        @NonNull IMap runningJobStateIMap,
        @NonNull IMap runningJobStateTimestampsIMap,
        @NonNull QueueType queueType,
        @NonNull EngineConfig engineConfig) {
    return new PhysicalPlanGenerator(
                    new ExecutionPlanGenerator(
                                    logicalDag, jobImmutableInformation, engineConfig)
                            .generate(),
                    nodeEngine,
                    jobImmutableInformation,
                    initializationTimestamp,
                    executorService,
                    flakeIdGenerator,
                    runningJobStateIMap,
                    runningJobStateTimestampsIMap,
                    queueType)
            .generate();
}
|
执行计划的生成
 1
 2
 3
 4
 5
 6
 7
 8
 9
10
11
12
13
14
15
16
17
18
19
20
21
22
23
24
25
26
27
28
29
30
31
|
public ExecutionPlanGenerator(
        @NonNull LogicalDag logicalPlan,
        @NonNull JobImmutableInformation jobImmutableInformation,
        @NonNull EngineConfig engineConfig) {
    checkArgument(
            logicalPlan.getEdges().size() > 0, "ExecutionPlan Builder must have LogicalPlan.");
    this.logicalPlan = logicalPlan;
    this.jobImmutableInformation = jobImmutableInformation;
    this.engineConfig = engineConfig;
}

public ExecutionPlan generate() {
    log.debug("Generate execution plan using logical plan:");

    Set<ExecutionEdge> executionEdges = generateExecutionEdges(logicalPlan.getEdges());
    log.debug("Phase 1: generate execution edge list {}", executionEdges);

    executionEdges = generateShuffleEdges(executionEdges);
    log.debug("Phase 2: generate shuffle edge list {}", executionEdges);

    executionEdges = generateTransformChainEdges(executionEdges);
    log.debug("Phase 3: generate transform chain edge list {}", executionEdges);

    List<Pipeline> pipelines = generatePipelines(executionEdges);
    log.debug("Phase 4: generate pipeline list {}", pipelines);

    ExecutionPlan executionPlan = new ExecutionPlan(pipelines, jobImmutableInformation);
    log.debug("Phase 5: generate execution plan: {}", executionPlan);

    return executionPlan;
}
|
首先看下执行计划这个类里面有什么内容:
 1
 2
 3
 4
 5
 6
 7
 8
 9
10
11
12
13
14
15
16
17
18
19
20
21
22
23
|
public class ExecutionPlan {
    private final List<Pipeline> pipelines;
    private final JobImmutableInformation jobImmutableInformation;
}

public class Pipeline {
    /** The ID of the pipeline. */
    private final Integer id;
    private final List<ExecutionEdge> edges;
    private final Map<Long, ExecutionVertex> vertexes;

 }

 public class ExecutionEdge {
    private ExecutionVertex leftVertex;
    private ExecutionVertex rightVertex;
 }

public class ExecutionVertex {
    private Long vertexId;
    private Action action;
    private int parallelism;
}
|
我们再与逻辑计划比较一下
 1
 2
 3
 4
 5
 6
 7
 8
 9
10
11
12
13
14
15
16
17
18
19
20
|
public class LogicalDag implements IdentifiedDataSerializable {
    @Getter private JobConfig jobConfig;
    private final Set<LogicalEdge> edges = new LinkedHashSet<>();
    private final Map<Long, LogicalVertex> logicalVertexMap = new LinkedHashMap<>();
    private IdGenerator idGenerator;
    private boolean isStartWithSavePoint = false;
  }

 public class LogicalEdge implements IdentifiedDataSerializable {
    private LogicalVertex inputVertex;
    private LogicalVertex targetVertex;
    private Long inputVertexId;
    private Long targetVertexId;
 }

public class LogicalVertex implements IdentifiedDataSerializable {
    private Long vertexId;
    private Action action;
    private int parallelism;
 }
|
我们看这两个类的内容,感觉每个Pipeline都像一个逻辑计划,为什么需要这一步转换呢,我们来具体看下逻辑计划的生成过程。
在上面可以看到生成执行计划共有5步,我们逐步看下
 1
 2
 3
 4
 5
 6
 7
 8
 9
10
11
12
13
14
15
16
17
18
19
20
21
22
23
24
25
26
27
28
29
30
31
32
33
34
35
36
37
38
39
40
41
42
43
44
45
46
47
48
49
50
51
52
53
54
55
56
57
58
59
60
61
62
|
// 入参是逻辑计划的边,每个边存储了上下游的节点
private Set<ExecutionEdge> generateExecutionEdges(Set<LogicalEdge> logicalEdges) {
    Set<ExecutionEdge> executionEdges = new LinkedHashSet<>();

    Map<Long, ExecutionVertex> logicalVertexIdToExecutionVertexMap = new HashMap();
    // 按照顺序进行排序,首先按照输入节点的顺序进行排序,当输入节点相同时,按照输出节点进行排序
    List<LogicalEdge> sortedLogicalEdges = new ArrayList<>(logicalEdges);
    Collections.sort(
            sortedLogicalEdges,
            (o1, o2) -> {
                if (o1.getInputVertexId() != o2.getInputVertexId()) {
                    return o1.getInputVertexId() > o2.getInputVertexId() ? 1 : -1;
                }
                if (o1.getTargetVertexId() != o2.getTargetVertexId()) {
                    return o1.getTargetVertexId() > o2.getTargetVertexId() ? 1 : -1;
                }
                return 0;
            });
    // 循环将每个逻辑计划的边转换为执行计划的边
    for (LogicalEdge logicalEdge : sortedLogicalEdges) {
        LogicalVertex logicalInputVertex = logicalEdge.getInputVertex();
        ExecutionVertex executionInputVertex =
                logicalVertexIdToExecutionVertexMap.computeIfAbsent(
                        logicalInputVertex.getVertexId(),
                        vertexId -> {
                            long newId = idGenerator.getNextId();
                            // 对每个逻辑计划节点重新创建Action
                            Action newLogicalInputAction =
                                    recreateAction(
                                            logicalInputVertex.getAction(),
                                            newId,
                                            logicalInputVertex.getParallelism());
                            // 转换为执行计划节点
                            return new ExecutionVertex(
                                    newId,
                                    newLogicalInputAction,
                                    logicalInputVertex.getParallelism());
                        });
        // 与输入节点类似,重新创建执行计划节点
        LogicalVertex logicalTargetVertex = logicalEdge.getTargetVertex();
        ExecutionVertex executionTargetVertex =
                logicalVertexIdToExecutionVertexMap.computeIfAbsent(
                        logicalTargetVertex.getVertexId(),
                        vertexId -> {
                            long newId = idGenerator.getNextId();
                            Action newLogicalTargetAction =
                                    recreateAction(
                                            logicalTargetVertex.getAction(),
                                            newId,
                                            logicalTargetVertex.getParallelism());
                            return new ExecutionVertex(
                                    newId,
                                    newLogicalTargetAction,
                                    logicalTargetVertex.getParallelism());
                        });
        // 生成执行计划的边
        ExecutionEdge executionEdge =
                new ExecutionEdge(executionInputVertex, executionTargetVertex);
        executionEdges.add(executionEdge);
    }
    return executionEdges;
}
|
 1
 2
 3
 4
 5
 6
 7
 8
 9
10
11
12
13
14
15
16
17
18
19
20
21
22
23
24
25
26
27
28
29
30
31
32
33
34
35
36
37
38
39
40
41
42
43
44
45
46
47
48
49
50
51
52
53
54
55
56
57
58
59
60
61
62
63
64
65
66
67
68
69
70
71
72
73
74
75
76
77
78
79
80
81
82
83
84
85
86
87
88
89
90
|
private Set<ExecutionEdge> generateShuffleEdges(Set<ExecutionEdge> executionEdges) {
    // 以上游节点编号为key,list存储下游所有节点
    Map<Long, List<ExecutionVertex>> targetVerticesMap = new LinkedHashMap<>();
    // 仅存储类型为Source的节点
    Set<ExecutionVertex> sourceExecutionVertices = new HashSet<>();
    executionEdges.forEach(
            edge -> {
                ExecutionVertex leftVertex = edge.getLeftVertex();
                ExecutionVertex rightVertex = edge.getRightVertex();
                if (leftVertex.getAction() instanceof SourceAction) {
                    sourceExecutionVertices.add(leftVertex);
                }
                targetVerticesMap
                        .computeIfAbsent(leftVertex.getVertexId(), id -> new ArrayList<>())
                        .add(rightVertex);
            });
    if (sourceExecutionVertices.size() != 1) {
        return executionEdges;
    }
    ExecutionVertex sourceExecutionVertex = sourceExecutionVertices.stream().findFirst().get();
    Action sourceAction = sourceExecutionVertex.getAction();
    List<CatalogTable> producedCatalogTables = new ArrayList<>();
    if (sourceAction instanceof SourceAction) {
        try {
            producedCatalogTables =
                    ((SourceAction<?, ?, ?>) sourceAction)
                            .getSource()
                            .getProducedCatalogTables();
        } catch (UnsupportedOperationException e) {
        }
    } else if (sourceAction instanceof TransformChainAction) {
        return executionEdges;
    } else {
        throw new SeaTunnelException(
                "source action must be SourceAction or TransformChainAction");
    }
    // 数据源仅产生单表或
    // 数据源仅有一个下游输出时,直接返回
    if (producedCatalogTables.size() <= 1
            || targetVerticesMap.get(sourceExecutionVertex.getVertexId()).size() <= 1) {
        return executionEdges;
    }

    List<ExecutionVertex> sinkVertices =
            targetVerticesMap.get(sourceExecutionVertex.getVertexId());
    // 检查是否有其他类型的Action,在当前步骤下游节点尽可能有两种类型,Transform与Sink,这里是判断仅能有Sink类型
    Optional<ExecutionVertex> hasOtherAction =
            sinkVertices.stream()
                    .filter(vertex -> !(vertex.getAction() instanceof SinkAction))
                    .findFirst();

    checkArgument(!hasOtherAction.isPresent());
    // 当以上代码全部走完之后,当前的场景为:
    // 仅有一个数据源,该数据源会产生多张表,下游还有多个sink节点依赖与产生的多表
    // 也就是说当前任务仅有两类节点,一个会产生多张表的Source节点,一组依赖与该Source的Sink节点
    // 那么会新生成一个shuffle节点,添加到两者之间
    // 将依赖关系修改与source->shuffle->多个sink
    Set<ExecutionEdge> newExecutionEdges = new LinkedHashSet<>();
    // 这里的Shuffle策略此次不深入了解了
    ShuffleStrategy shuffleStrategy =
            ShuffleMultipleRowStrategy.builder()
                    .jobId(jobImmutableInformation.getJobId())
                    .inputPartitions(sourceAction.getParallelism())
                    .catalogTables(producedCatalogTables)
                    .queueEmptyQueueTtl(
                            (int)
                                    (engineConfig.getCheckpointConfig().getCheckpointInterval()
                                            * 3))
                    .build();
    ShuffleConfig shuffleConfig =
            ShuffleConfig.builder().shuffleStrategy(shuffleStrategy).build();

    long shuffleVertexId = idGenerator.getNextId();
    String shuffleActionName = String.format("Shuffle [%s]", sourceAction.getName());
    ShuffleAction shuffleAction =
            new ShuffleAction(shuffleVertexId, shuffleActionName, shuffleConfig);
    shuffleAction.setParallelism(sourceAction.getParallelism());
    ExecutionVertex shuffleVertex =
            new ExecutionVertex(shuffleVertexId, shuffleAction, shuffleAction.getParallelism());
    ExecutionEdge sourceToShuffleEdge = new ExecutionEdge(sourceExecutionVertex, shuffleVertex);
    newExecutionEdges.add(sourceToShuffleEdge);
    // 将多个sink节点的并行度修改为1
    for (ExecutionVertex sinkVertex : sinkVertices) {
        sinkVertex.setParallelism(1);
        sinkVertex.getAction().setParallelism(1);
        ExecutionEdge shuffleToSinkEdge = new ExecutionEdge(shuffleVertex, sinkVertex);
        newExecutionEdges.add(shuffleToSinkEdge);
    }
    return newExecutionEdges;
}
|
这一步Shuffle是针对某些特殊场景,source支持多表读取,并且有多个sink节点依赖与该source节点时会在中间添加一个shuffle节点
  1
  2
  3
  4
  5
  6
  7
  8
  9
 10
 11
 12
 13
 14
 15
 16
 17
 18
 19
 20
 21
 22
 23
 24
 25
 26
 27
 28
 29
 30
 31
 32
 33
 34
 35
 36
 37
 38
 39
 40
 41
 42
 43
 44
 45
 46
 47
 48
 49
 50
 51
 52
 53
 54
 55
 56
 57
 58
 59
 60
 61
 62
 63
 64
 65
 66
 67
 68
 69
 70
 71
 72
 73
 74
 75
 76
 77
 78
 79
 80
 81
 82
 83
 84
 85
 86
 87
 88
 89
 90
 91
 92
 93
 94
 95
 96
 97
 98
 99
100
101
102
103
104
105
106
107
108
109
110
111
112
113
114
115
116
117
118
119
120
121
122
123
124
125
126
127
128
129
130
131
132
133
134
135
136
137
138
139
140
141
142
143
144
145
146
147
148
149
150
151
152
153
154
155
156
157
158
159
160
161
162
163
164
165
166
167
168
169
170
171
172
173
174
175
176
177
178
179
180
181
|
private Set<ExecutionEdge> generateTransformChainEdges(Set<ExecutionEdge> executionEdges) {
    // 使用了三个结构,存储所有的Source节点,以及每个输入,输出节点
    // inputVerticesMap中以下游节点id为key,存储了所有的上游输入节点
    // targetVerticesMap则以上游节点id为key,存储了所有的下游输出节点
    Map<Long, List<ExecutionVertex>> inputVerticesMap = new HashMap<>();
    Map<Long, List<ExecutionVertex>> targetVerticesMap = new HashMap<>();
    Set<ExecutionVertex> sourceExecutionVertices = new HashSet<>();
    executionEdges.forEach(
            edge -> {
                ExecutionVertex leftVertex = edge.getLeftVertex();
                ExecutionVertex rightVertex = edge.getRightVertex();
                if (leftVertex.getAction() instanceof SourceAction) {
                    sourceExecutionVertices.add(leftVertex);
                }
                inputVerticesMap
                        .computeIfAbsent(rightVertex.getVertexId(), id -> new ArrayList<>())
                        .add(leftVertex);
                targetVerticesMap
                        .computeIfAbsent(leftVertex.getVertexId(), id -> new ArrayList<>())
                        .add(rightVertex);
            });

    Map<Long, ExecutionVertex> transformChainVertexMap = new HashMap<>();
    Map<Long, Long> chainedTransformVerticesMapping = new HashMap<>();
    // 对每个source进行循环,即从DAG中所有的头节点开始变量
    for (ExecutionVertex sourceVertex : sourceExecutionVertices) {
        List<ExecutionVertex> vertices = new ArrayList<>();
        vertices.add(sourceVertex);
        for (int index = 0; index < vertices.size(); index++) {
            ExecutionVertex vertex = vertices.get(index);

            fillChainedTransformExecutionVertex(
                    vertex,
                    chainedTransformVerticesMapping,
                    transformChainVertexMap,
                    executionEdges,
                    Collections.unmodifiableMap(inputVerticesMap),
                    Collections.unmodifiableMap(targetVerticesMap));
            // 当当前节点存在下游节点时,将所有下游节点放入list中,二层循环会重新计算刚刚加入进去的下游节点,可能是Transform节点也可能是Sink节点
            if (targetVerticesMap.containsKey(vertex.getVertexId())) {
                vertices.addAll(targetVerticesMap.get(vertex.getVertexId()));
            }
        }
    }
    // 循环完成,会将可以链化的Transform节点进行链化,在链化过程中会将可以链化的关系边从执行计划中删除
    // 所以此时的逻辑计划已经无法构成图的关系,需要重新构建
    Set<ExecutionEdge> transformChainEdges = new LinkedHashSet<>();
    // 对现存关系进行循环
    for (ExecutionEdge executionEdge : executionEdges) {
        ExecutionVertex leftVertex = executionEdge.getLeftVertex();
        ExecutionVertex rightVertex = executionEdge.getRightVertex();
        boolean needRebuild = false;
        // 会从链化的map中查询当前边的输入,输出节点
        // 如果在链化的map中存在,则表明该节点已经被链化,需要从映射关系中找到链化之后的节点
        // 重新修正DAG
        if (chainedTransformVerticesMapping.containsKey(leftVertex.getVertexId())) {
            needRebuild = true;
            leftVertex =
                    transformChainVertexMap.get(
                            chainedTransformVerticesMapping.get(leftVertex.getVertexId()));
        }
        if (chainedTransformVerticesMapping.containsKey(rightVertex.getVertexId())) {
            needRebuild = true;
            rightVertex =
                    transformChainVertexMap.get(
                            chainedTransformVerticesMapping.get(rightVertex.getVertexId()));
        }
        if (needRebuild) {
            executionEdge = new ExecutionEdge(leftVertex, rightVertex);
        }
        transformChainEdges.add(executionEdge);
    }
    return transformChainEdges;
}

private void fillChainedTransformExecutionVertex(
        ExecutionVertex currentVertex,
        Map<Long, Long> chainedTransformVerticesMapping,
        Map<Long, ExecutionVertex> transformChainVertexMap,
        Set<ExecutionEdge> executionEdges,
        Map<Long, List<ExecutionVertex>> inputVerticesMap,
        Map<Long, List<ExecutionVertex>> targetVerticesMap) {
    // 当map中以及包含当前节点则退出
    if (chainedTransformVerticesMapping.containsKey(currentVertex.getVertexId())) {
        return;
    }

    List<ExecutionVertex> transformChainedVertices = new ArrayList<>();
    collectChainedVertices(
            currentVertex,
            transformChainedVertices,
            executionEdges,
            inputVerticesMap,
            targetVerticesMap);
    // 当list不为空时,表示list里面的transform节点可以被合并成一个
    if (transformChainedVertices.size() > 0) {
        long newVertexId = idGenerator.getNextId();
        List<SeaTunnelTransform> transforms = new ArrayList<>(transformChainedVertices.size());
        List<String> names = new ArrayList<>(transformChainedVertices.size());
        Set<URL> jars = new HashSet<>();
        Set<ConnectorJarIdentifier> identifiers = new HashSet<>();

        transformChainedVertices.stream()
                .peek(
                        // 在mapping中添加所有历史节点编号与新节点编号的映射
                        vertex ->
                                chainedTransformVerticesMapping.put(
                                        vertex.getVertexId(), newVertexId))
                .map(ExecutionVertex::getAction)
                .map(action -> (TransformAction) action)
                .forEach(
                        action -> {
                            transforms.add(action.getTransform());
                            jars.addAll(action.getJarUrls());
                            identifiers.addAll(action.getConnectorJarIdentifiers());
                            names.add(action.getName());
                        });
        String transformChainActionName =
                String.format("TransformChain[%s]", String.join("->", names));
        // 将多个TransformAction合并成一个TransformChainAction
        TransformChainAction transformChainAction =
                new TransformChainAction(
                        newVertexId, transformChainActionName, jars, identifiers, transforms);
        transformChainAction.setParallelism(currentVertex.getAction().getParallelism());

        ExecutionVertex executionVertex =
                new ExecutionVertex(
                        newVertexId, transformChainAction, currentVertex.getParallelism());
        // 在状态中将修改完成的节点信息放入
        transformChainVertexMap.put(newVertexId, executionVertex);
        chainedTransformVerticesMapping.put(
                currentVertex.getVertexId(), executionVertex.getVertexId());
    }
}


private void collectChainedVertices(
        ExecutionVertex currentVertex,
        List<ExecutionVertex> chainedVertices,
        Set<ExecutionEdge> executionEdges,
        Map<Long, List<ExecutionVertex>> inputVerticesMap,
        Map<Long, List<ExecutionVertex>> targetVerticesMap) {
    Action action = currentVertex.getAction();
    // 仅对TransformAction进行合并
    if (action instanceof TransformAction) {
        if (chainedVertices.size() == 0) {
            // 需要进行合并的节点list为空时,将自身添加到list中
            // 进入该分支的条件为当前节点为TransformAction并且所需链化列表为空
            // 此时可能有几种场景:第一个Transform节点进入,该Transform节点无任何限制
            chainedVertices.add(currentVertex);
        } else if (inputVerticesMap.get(currentVertex.getVertexId()).size() == 1) {
            // 当进入该条件分支则表明:
            // 所需链化的列表chainedVertices已经至少有一个TransformAction了
            // 此时的场景为:上游的Transform节点仅有一个下游节点,即当前节点。此限制是由下方的判断保证
            // 将当前TransformAction节点与上一个TransformAction节点进行链化
            // 在执行计划中将该关系删除
            executionEdges.remove(
                    new ExecutionEdge(
                            chainedVertices.get(chainedVertices.size() - 1), currentVertex));
            // 将自身加入需要链化的list中
            chainedVertices.add(currentVertex);
        } else {
            return;
        }
    } else {
        return;
    }

    // It cannot chain to any target vertex if it has multiple target vertices.
    if (targetVerticesMap.get(currentVertex.getVertexId()).size() == 1) {
        // 当当前节点仅有一个下游节点时,再次尝试链化
        // 如果当前节点存在多个下游节点,则不会将下游的节点进行链化,所以能保证上面的链化时两个节点是一对一的关系
        // 这里会调用的场景为Transform节点仅有一个下游节点
        collectChainedVertices(
                targetVerticesMap.get(currentVertex.getVertexId()).get(0),
                chainedVertices,
                executionEdges,
                inputVerticesMap,
                targetVerticesMap);
    }
}
|
 1
 2
 3
 4
 5
 6
 7
 8
 9
10
11
12
13
14
15
16
17
18
19
20
21
22
23
24
25
26
27
28
29
30
31
32
33
34
35
36
37
38
39
40
41
42
43
44
45
46
47
48
49
50
51
52
53
54
55
56
57
58
59
60
61
62
63
64
65
66
67
68
69
70
71
72
73
74
75
76
77
78
79
80
81
82
83
84
85
86
87
88
89
90
91
92
|
private List<Pipeline> generatePipelines(Set<ExecutionEdge> executionEdges) {
    // 存储每个执行计划节点
    Set<ExecutionVertex> executionVertices = new LinkedHashSet<>();
    for (ExecutionEdge edge : executionEdges) {
        executionVertices.add(edge.getLeftVertex());
        executionVertices.add(edge.getRightVertex());
    }
    // 调用Pipeline执行器将执行计划转换为Pipeline
    PipelineGenerator pipelineGenerator =
            new PipelineGenerator(executionVertices, new ArrayList<>(executionEdges));
    List<Pipeline> pipelines = pipelineGenerator.generatePipelines();

    Set<String> duplicatedActionNames = new HashSet<>();
    Set<String> actionNames = new HashSet<>();
    for (Pipeline pipeline : pipelines) {
        Integer pipelineId = pipeline.getId();
        for (ExecutionVertex vertex : pipeline.getVertexes().values()) {
            // 获取当前Pipeline的每个执行节点,重新设置Action的名称,添加了pipeline的名称
            Action action = vertex.getAction();
            String actionName = String.format("pipeline-%s [%s]", pipelineId, action.getName());
            action.setName(actionName);
            if (actionNames.contains(actionName)) {
                duplicatedActionNames.add(actionName);
            }
            actionNames.add(actionName);
        }
    }
    // 检查,不能存在重复的Action Name
    checkArgument(
            duplicatedActionNames.isEmpty(),
            "Action name is duplicated: " + duplicatedActionNames);

    return pipelines;
}


public PipelineGenerator(Collection<ExecutionVertex> vertices, List<ExecutionEdge> edges) {
    this.vertices = vertices;
    this.edges = edges;
}

public List<Pipeline> generatePipelines() {
    List<ExecutionEdge> executionEdges = expandEdgeByParallelism(edges);

    // 将执行计划进行拆分,按照关联关系,将执行计划进行拆分
    // 拆分为几个不相关的执行计划
    List<List<ExecutionEdge>> edgesList = splitUnrelatedEdges(executionEdges);

    edgesList =
            edgesList.stream()
                    .flatMap(e -> this.splitUnionEdge(e).stream())
                    .collect(Collectors.toList());

    // just convert execution plan to pipeline at now. We should split it to multi pipeline with
    // cache in the future
    IdGenerator idGenerator = new IdGenerator();
    // 将执行计划图转换为Pipeline
    return edgesList.stream()
            .map(
                    e -> {
                        Map<Long, ExecutionVertex> vertexes = new HashMap<>();
                        List<ExecutionEdge> pipelineEdges =
                                e.stream()
                                        .map(
                                                edge -> {
                                                    if (!vertexes.containsKey(
                                                            edge.getLeftVertexId())) {
                                                        vertexes.put(
                                                                edge.getLeftVertexId(),
                                                                edge.getLeftVertex());
                                                    }
                                                    ExecutionVertex source =
                                                            vertexes.get(
                                                                    edge.getLeftVertexId());
                                                    if (!vertexes.containsKey(
                                                            edge.getRightVertexId())) {
                                                        vertexes.put(
                                                                edge.getRightVertexId(),
                                                                edge.getRightVertex());
                                                    }
                                                    ExecutionVertex destination =
                                                            vertexes.get(
                                                                    edge.getRightVertexId());
                                                    return new ExecutionEdge(
                                                            source, destination);
                                                })
                                        .collect(Collectors.toList());
                        return new Pipeline(
                                (int) idGenerator.getNextId(), pipelineEdges, vertexes);
                    })
            .collect(Collectors.toList());
}
|
第五步则是生成执行计划实例,传递了第四步生成的Pipeline参数
小结一下:
执行计划会将逻辑计划做这几件事情
- 当source会生成多张表,并且有多个sink节点依赖于此source时,会在中间添加一个shuffle节点
- 尝试对transform节点进行链化合并,将多个transform节点合并为一个节点
- 将任务进行拆分,将一个
配置文件/LogicalDag拆分为几个不相关的任务List<Pipeline>
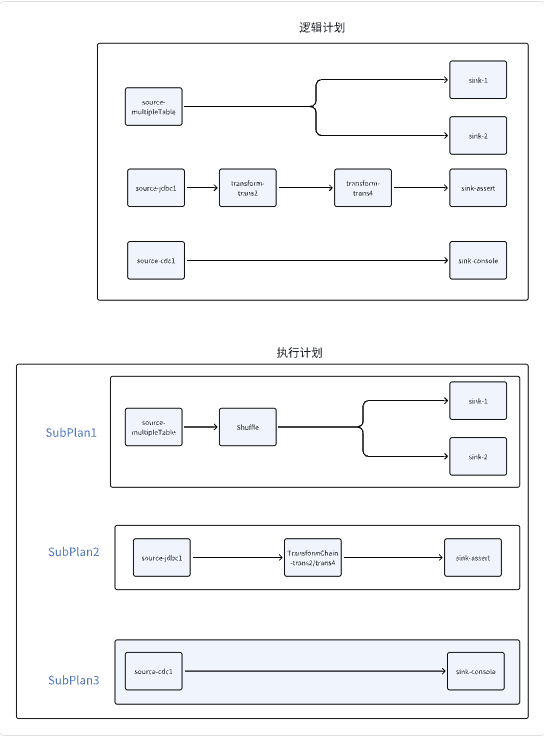
物理计划的生成
在看物理计划生成之前,先看下生成的物理计划中包含了什么信息,
我们对物理计划以及内部相关的内都拿出来看一下相关信息
 1
 2
 3
 4
 5
 6
 7
 8
 9
10
11
12
13
14
15
16
17
|
public class PhysicalPlan {
    private final List<SubPlan> pipelineList;
    private final AtomicInteger finishedPipelineNum = new AtomicInteger(0);
    private final AtomicInteger canceledPipelineNum = new AtomicInteger(0);
    private final AtomicInteger failedPipelineNum = new AtomicInteger(0);
    private final JobImmutableInformation jobImmutableInformation;
    private final IMap<Object, Object> runningJobStateIMap;
    private final IMap<Object, Long[]> runningJobStateTimestampsIMap;
    private CompletableFuture<JobResult> jobEndFuture;
    private final AtomicReference<String> errorBySubPlan = new AtomicReference<>();
    private final String jobFullName;
    private final long jobId;
    private JobMaster jobMaster;
    private boolean makeJobEndWhenPipelineEnded = true;
    private volatile boolean isRunning = false;

   }
|
这个类中有一个关键字段pipelineList,是一个SubPlan的列表
 1
 2
 3
 4
 5
 6
 7
 8
 9
10
11
12
13
14
15
16
17
18
19
20
21
22
23
24
25
|
public class SubPlan {
    private final int pipelineMaxRestoreNum;
    private final int pipelineRestoreIntervalSeconds;
    private final List<PhysicalVertex> physicalVertexList;
    private final List<PhysicalVertex> coordinatorVertexList;
    private final int pipelineId;
    private final AtomicInteger finishedTaskNum = new AtomicInteger(0);
    private final AtomicInteger canceledTaskNum = new AtomicInteger(0);
    private final AtomicInteger failedTaskNum = new AtomicInteger(0);
    private final String pipelineFullName;
    private final IMap<Object, Object> runningJobStateIMap;
    private final Map<String, String> tags;
    private final IMap<Object, Long[]> runningJobStateTimestampsIMap;
    private CompletableFuture<PipelineExecutionState> pipelineFuture;
    private final PipelineLocation pipelineLocation;
    private AtomicReference<String> errorByPhysicalVertex = new AtomicReference<>();
    private final ExecutorService executorService;
    private JobMaster jobMaster;
    private PassiveCompletableFuture<Void> reSchedulerPipelineFuture;
    private Integer pipelineRestoreNum;
    private final Object restoreLock = new Object();
    private volatile PipelineStatus currPipelineStatus;
    public volatile boolean isRunning = false;
    private Map<TaskGroupLocation, SlotProfile> slotProfiles;
 }
|
在SubPlan中,又维护了PhysicalVertex物理节点的一个列表,并且拆分成了物理计划节点和协调器节点。
 1
 2
 3
 4
 5
 6
 7
 8
 9
10
11
12
13
14
15
16
17
18
|
public class PhysicalVertex {
    private final TaskGroupLocation taskGroupLocation;
    private final String taskFullName;
    private final TaskGroupDefaultImpl taskGroup;
    private final ExecutorService executorService;
    private final FlakeIdGenerator flakeIdGenerator;
    private final Set<URL> pluginJarsUrls;
    private final Set<ConnectorJarIdentifier> connectorJarIdentifiers;
    private final IMap<Object, Object> runningJobStateIMap;
    private CompletableFuture<TaskExecutionState> taskFuture;
    private final IMap<Object, Long[]> runningJobStateTimestampsIMap;
    private final NodeEngine nodeEngine;
    private JobMaster jobMaster;
    private volatile ExecutionState currExecutionState = ExecutionState.CREATED;
    public volatile boolean isRunning = false;
    private AtomicReference<String> errorByPhysicalVertex = new AtomicReference<>();

  }
|
1
2
3
4
5
6
7
8
|
public class TaskGroupDefaultImpl implements TaskGroup {
    private final TaskGroupLocation taskGroupLocation;

    private final String taskGroupName;
    // 存储了当前物理节点所需要执行的task
    // 这里的每个task可能是一个读取数据的任务,也可能是一个写入数据的任务
    // 或者是数据拆分,checkpoint的任务等等
    private final Map<Long, Task> tasks;
|
  1
  2
  3
  4
  5
  6
  7
  8
  9
 10
 11
 12
 13
 14
 15
 16
 17
 18
 19
 20
 21
 22
 23
 24
 25
 26
 27
 28
 29
 30
 31
 32
 33
 34
 35
 36
 37
 38
 39
 40
 41
 42
 43
 44
 45
 46
 47
 48
 49
 50
 51
 52
 53
 54
 55
 56
 57
 58
 59
 60
 61
 62
 63
 64
 65
 66
 67
 68
 69
 70
 71
 72
 73
 74
 75
 76
 77
 78
 79
 80
 81
 82
 83
 84
 85
 86
 87
 88
 89
 90
 91
 92
 93
 94
 95
 96
 97
 98
 99
100
101
102
103
104
105
106
|
public PhysicalPlanGenerator(
        @NonNull ExecutionPlan executionPlan,
        @NonNull NodeEngine nodeEngine,
        @NonNull JobImmutableInformation jobImmutableInformation,
        long initializationTimestamp,
        @NonNull ExecutorService executorService,
        @NonNull FlakeIdGenerator flakeIdGenerator,
        @NonNull IMap runningJobStateIMap,
        @NonNull IMap runningJobStateTimestampsIMap,
        @NonNull QueueType queueType) {
    this.pipelines = executionPlan.getPipelines();
    this.nodeEngine = nodeEngine;
    this.jobImmutableInformation = jobImmutableInformation;
    this.initializationTimestamp = initializationTimestamp;
    this.executorService = executorService;
    this.flakeIdGenerator = flakeIdGenerator;
    // the checkpoint of a pipeline
    this.pipelineTasks = new HashSet<>();
    this.startingTasks = new HashSet<>();
    this.subtaskActions = new HashMap<>();
    this.runningJobStateIMap = runningJobStateIMap;
    this.runningJobStateTimestampsIMap = runningJobStateTimestampsIMap;
    this.queueType = queueType;
}

public Tuple2<PhysicalPlan, Map<Integer, CheckpointPlan>> generate() {
    // 获取用户配置中的节点过滤条件,用于选择任务将要运行的节点
    Map<String, String> tagFilter =
            (Map<String, String>)
                    jobImmutableInformation
                            .getJobConfig()
                            .getEnvOptions()
                            .get(EnvCommonOptions.NODE_TAG_FILTER.key());
    // TODO Determine which tasks do not need to be restored according to state
    CopyOnWriteArrayList<PassiveCompletableFuture<PipelineStatus>>
            waitForCompleteBySubPlanList = new CopyOnWriteArrayList<>();

    Map<Integer, CheckpointPlan> checkpointPlans = new HashMap<>();
    final int totalPipelineNum = pipelines.size();
    Stream<SubPlan> subPlanStream =
            pipelines.stream()
                    .map(
                            pipeline -> {
                                // 每次都将状态清空
                                this.pipelineTasks.clear();
                                this.startingTasks.clear();
                                this.subtaskActions.clear();
                                final int pipelineId = pipeline.getId();
                                // 获取当前任务的信息
                                final List<ExecutionEdge> edges = pipeline.getEdges();
                                // 获取所有的SourceAction
                                List<SourceAction<?, ?, ?>> sources = findSourceAction(edges);
                                // 生成Source数据切片任务,即SourceSplitEnumeratorTask,
                                // 这个任务会调用连接器中的SourceSplitEnumerator类,如果该连接器支持的话
                                List<PhysicalVertex> coordinatorVertexList =
                                        getEnumeratorTask(
                                                sources, pipelineId, totalPipelineNum);
                                // 生成Sink提交任务,即SinkAggregatedCommitterTask
                                // 这个任务会调用连接器中的SinkAggregatedCommitter类,如果该连接器支持的话
                                // 这两个任务是作为协调任务来执行的
                                coordinatorVertexList.addAll(
                                        getCommitterTask(edges, pipelineId, totalPipelineNum));
                                List<PhysicalVertex> physicalVertexList =
                                        getSourceTask(
                                                edges, sources, pipelineId, totalPipelineNum);
                                //
                                physicalVertexList.addAll(
                                        getShuffleTask(edges, pipelineId, totalPipelineNum));

                                CompletableFuture<PipelineStatus> pipelineFuture =
                                        new CompletableFuture<>();
                                waitForCompleteBySubPlanList.add(
                                        new PassiveCompletableFuture<>(pipelineFuture));
                                // 添加checkpoint的任务
                                checkpointPlans.put(
                                        pipelineId,
                                        CheckpointPlan.builder()
                                                .pipelineId(pipelineId)
                                                .pipelineSubtasks(pipelineTasks)
                                                .startingSubtasks(startingTasks)
                                                .pipelineActions(pipeline.getActions())
                                                .subtaskActions(subtaskActions)
                                                .build());
                                return new SubPlan(
                                        pipelineId,
                                        totalPipelineNum,
                                        initializationTimestamp,
                                        physicalVertexList,
                                        coordinatorVertexList,
                                        jobImmutableInformation,
                                        executorService,
                                        runningJobStateIMap,
                                        runningJobStateTimestampsIMap,
                                        tagFilter);
                            });

    PhysicalPlan physicalPlan =
            new PhysicalPlan(
                    subPlanStream.collect(Collectors.toList()),
                    executorService,
                    jobImmutableInformation,
                    initializationTimestamp,
                    runningJobStateIMap,
                    runningJobStateTimestampsIMap);
    return Tuple2.tuple2(physicalPlan, checkpointPlans);
}
|
生成物理计划的过程就是去将执行计划转换成SeaTunnelTask,并且在执行过程中添加各种协调任务,例如数据切分任务,数据提交任务,checkpoint任务。
在SeaTunnelTask中,会将任务转换成SourceFlowLifeCycle,SinkFlowLifeCycle,TransformFlowLifeCycle,ShuffleSinkFlowLifeCycle,ShuffleSourceFlowLifeCycle。
我们以SourceFlowLifeCycle, SinkFlowLifeCycle为例
 1
 2
 3
 4
 5
 6
 7
 8
 9
10
11
12
13
14
15
16
17
18
19
20
21
22
23
24
25
26
27
28
29
30
31
32
33
34
35
36
37
38
39
40
41
42
43
44
45
46
47
48
49
50
51
52
53
54
55
56
57
58
59
60
61
62
63
64
65
66
67
68
69
70
|
@Override
public void init() throws Exception {
    this.splitSerializer = sourceAction.getSource().getSplitSerializer();
    this.reader =
            sourceAction
                    .getSource()
                    .createReader(
                            new SourceReaderContext(
                                    indexID,
                                    sourceAction.getSource().getBoundedness(),
                                    this,
                                    metricsContext,
                                    eventListener));
    this.enumeratorTaskAddress = getEnumeratorTaskAddress();
}

@Override
public void open() throws Exception {
    reader.open();
    register();
}


public void collect() throws Exception {
    if (!prepareClose) {
        if (schemaChanging()) {
            log.debug("schema is changing, stop reader collect records");

            Thread.sleep(200);
            return;
        }

        reader.pollNext(collector);
        if (collector.isEmptyThisPollNext()) {
            Thread.sleep(100);
        } else {
            collector.resetEmptyThisPollNext();
            /**
             * The current thread obtain a checkpoint lock in the method {@link
             * SourceReader#pollNext(Collector)}. When trigger the checkpoint or savepoint,
             * other threads try to obtain the lock in the method {@link
             * SourceFlowLifeCycle#triggerBarrier(Barrier)}. When high CPU load, checkpoint
             * process may be blocked as long time. So we need sleep to free the CPU.
             */
            Thread.sleep(0L);
        }

        if (collector.captureSchemaChangeBeforeCheckpointSignal()) {
            if (schemaChangePhase.get() != null) {
                throw new IllegalStateException(
                        "previous schema changes in progress, schemaChangePhase: "
                                + schemaChangePhase.get());
            }
            schemaChangePhase.set(SchemaChangePhase.createBeforePhase());
            runningTask.triggerSchemaChangeBeforeCheckpoint().get();
            log.info("triggered schema-change-before checkpoint, stopping collect data");
        } else if (collector.captureSchemaChangeAfterCheckpointSignal()) {
            if (schemaChangePhase.get() != null) {
                throw new IllegalStateException(
                        "previous schema changes in progress, schemaChangePhase: "
                                + schemaChangePhase.get());
            }
            schemaChangePhase.set(SchemaChangePhase.createAfterPhase());
            runningTask.triggerSchemaChangeAfterCheckpoint().get();
            log.info("triggered schema-change-after checkpoint, stopping collect data");
        }
    } else {
        Thread.sleep(100);
    }
}
|
可以看到Source的数据读取,是在SourceFlowLifeCycle的collect方法中被真正的调用,
数据读取到之后,会放入SeaTunnelSourceCollector中,在这个collector中,当接收到数据时,会进行指标的更新,并将数据发送给相关的下游
 1
 2
 3
 4
 5
 6
 7
 8
 9
10
11
12
13
14
15
16
17
18
19
20
21
22
23
24
25
26
27
28
29
30
31
32
33
34
35
36
37
38
39
40
41
42
43
44
45
46
|
@Override
public void collect(T row) {
    try {
        if (row instanceof SeaTunnelRow) {
            String tableId = ((SeaTunnelRow) row).getTableId();
            int size;
            if (rowType instanceof SeaTunnelRowType) {
                size = ((SeaTunnelRow) row).getBytesSize((SeaTunnelRowType) rowType);
            } else if (rowType instanceof MultipleRowType) {
                size = ((SeaTunnelRow) row).getBytesSize(rowTypeMap.get(tableId));
            } else {
                throw new SeaTunnelEngineException(
                        "Unsupported row type: " + rowType.getClass().getName());
            }
            sourceReceivedBytes.inc(size);
            sourceReceivedBytesPerSeconds.markEvent(size);
            flowControlGate.audit((SeaTunnelRow) row);
            if (StringUtils.isNotEmpty(tableId)) {
                String tableName = getFullName(TablePath.of(tableId));
                Counter sourceTableCounter = sourceReceivedCountPerTable.get(tableName);
                if (Objects.nonNull(sourceTableCounter)) {
                    sourceTableCounter.inc();
                } else {
                    Counter counter =
                            metricsContext.counter(SOURCE_RECEIVED_COUNT + "#" + tableName);
                    counter.inc();
                    sourceReceivedCountPerTable.put(tableName, counter);
                }
            }
        }
        sendRecordToNext(new Record<>(row));
        emptyThisPollNext = false;
        sourceReceivedCount.inc();
        sourceReceivedQPS.markEvent();
    } catch (IOException e) {
        throw new RuntimeException(e);
    }
}

public void sendRecordToNext(Record<?> record) throws IOException {
    synchronized (checkpointLock) {
        for (OneInputFlowLifeCycle<Record<?>> output : outputs) {
            output.received(record);
        }
    }
}
|
 1
 2
 3
 4
 5
 6
 7
 8
 9
10
11
12
13
14
15
16
17
18
19
20
21
22
23
24
25
26
27
28
29
30
31
32
33
34
35
36
37
38
39
40
41
42
43
44
45
46
47
48
49
50
51
52
53
54
55
56
57
58
59
60
61
62
63
64
65
66
67
68
69
70
71
72
73
74
75
76
77
78
79
80
81
82
83
84
85
86
87
88
89
90
91
92
93
94
95
96
97
98
99
|
@Override
public void received(Record<?> record) {
    try {
        if (record.getData() instanceof Barrier) {
            long startTime = System.currentTimeMillis();

            Barrier barrier = (Barrier) record.getData();
            if (barrier.prepareClose(this.taskLocation)) {
                prepareClose = true;
            }
            if (barrier.snapshot()) {
                try {
                    lastCommitInfo = writer.prepareCommit();
                } catch (Exception e) {
                    writer.abortPrepare();
                    throw e;
                }
                List<StateT> states = writer.snapshotState(barrier.getId());
                if (!writerStateSerializer.isPresent()) {
                    runningTask.addState(
                            barrier, ActionStateKey.of(sinkAction), Collections.emptyList());
                } else {
                    runningTask.addState(
                            barrier,
                            ActionStateKey.of(sinkAction),
                            serializeStates(writerStateSerializer.get(), states));
                }
                if (containAggCommitter) {
                    CommitInfoT commitInfoT = null;
                    if (lastCommitInfo.isPresent()) {
                        commitInfoT = lastCommitInfo.get();
                    }
                    runningTask
                            .getExecutionContext()
                            .sendToMember(
                                    new SinkPrepareCommitOperation<CommitInfoT>(
                                            barrier,
                                            committerTaskLocation,
                                            commitInfoSerializer.isPresent()
                                                    ? commitInfoSerializer
                                                            .get()
                                                            .serialize(commitInfoT)
                                                    : null),
                                    committerTaskAddress)
                            .join();
                }
            } else {
                if (containAggCommitter) {
                    runningTask
                            .getExecutionContext()
                            .sendToMember(
                                    new BarrierFlowOperation(barrier, committerTaskLocation),
                                    committerTaskAddress)
                            .join();
                }
            }
            runningTask.ack(barrier);

            log.debug(
                    "trigger barrier [{}] finished, cost {}ms. taskLocation [{}]",
                    barrier.getId(),
                    System.currentTimeMillis() - startTime,
                    taskLocation);
        } else if (record.getData() instanceof SchemaChangeEvent) {
            if (prepareClose) {
                return;
            }
            SchemaChangeEvent event = (SchemaChangeEvent) record.getData();
            writer.applySchemaChange(event);
        } else {
            if (prepareClose) {
                return;
            }
            writer.write((T) record.getData());
            sinkWriteCount.inc();
            sinkWriteQPS.markEvent();
            if (record.getData() instanceof SeaTunnelRow) {
                long size = ((SeaTunnelRow) record.getData()).getBytesSize();
                sinkWriteBytes.inc(size);
                sinkWriteBytesPerSeconds.markEvent(size);
                String tableId = ((SeaTunnelRow) record.getData()).getTableId();
                if (StringUtils.isNotBlank(tableId)) {
                    String tableName = getFullName(TablePath.of(tableId));
                    Counter sinkTableCounter = sinkWriteCountPerTable.get(tableName);
                    if (Objects.nonNull(sinkTableCounter)) {
                        sinkTableCounter.inc();
                    } else {
                        Counter counter =
                                metricsContext.counter(SINK_WRITE_COUNT + "#" + tableName);
                        counter.inc();
                        sinkWriteCountPerTable.put(tableName, counter);
                    }
                }
            }
        }
    } catch (Exception e) {
        throw new RuntimeException(e);
    }
}
|
同样,在这个类中是真正调用Sink的Writer方法,将数据写入到下游中。
一个简易的图大概是这样
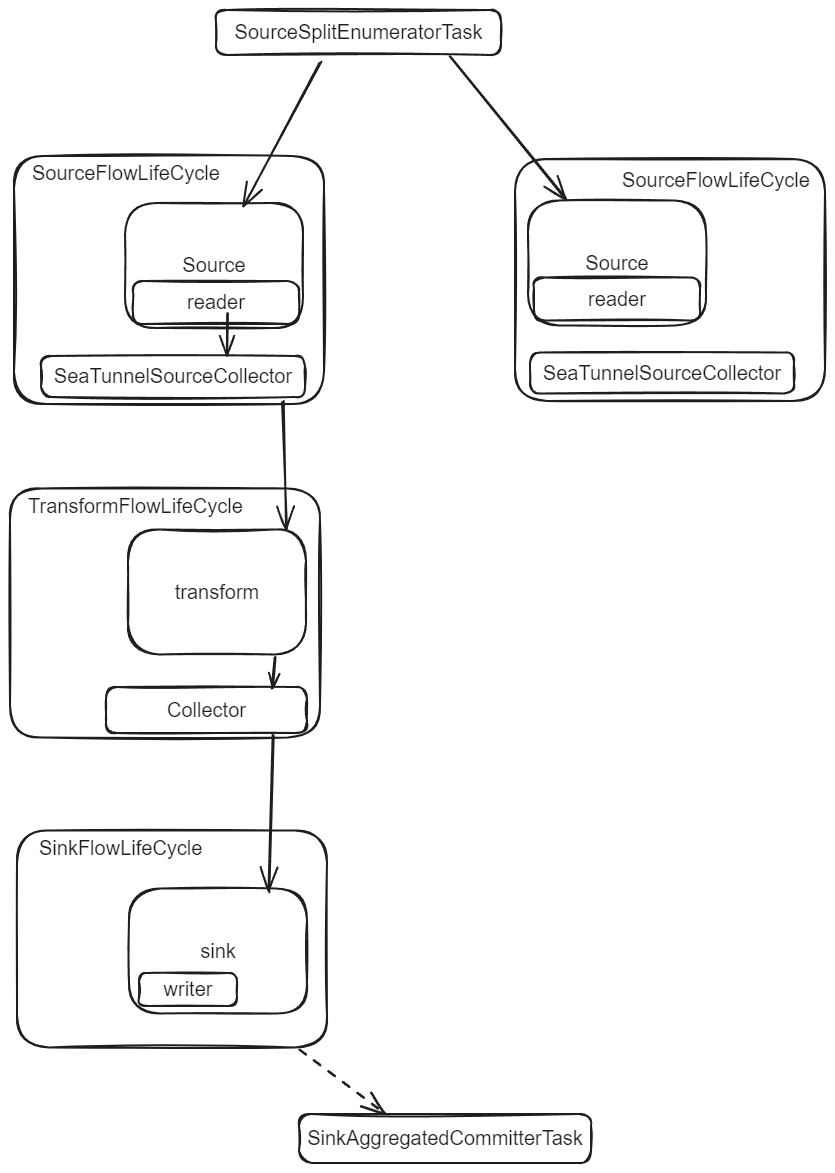
用图来详细拆解下物理计划的生成步骤:
以这个执行计划为例
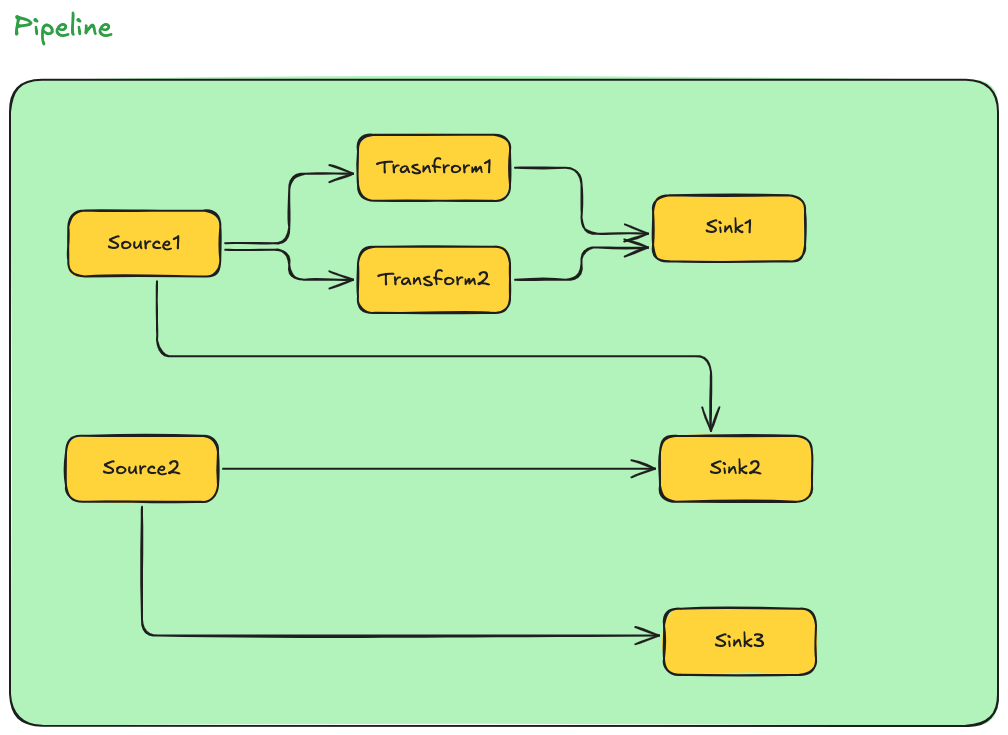 这个执行计划在经过查找
findSourceAction方法后, 可以得到这两个source action
 后续的分析仅会分析一下
source1的流程
在getSourceTask方法中, 首先会将SourceAction转化为PhyscicalExecutionFlow
source1会被转化为
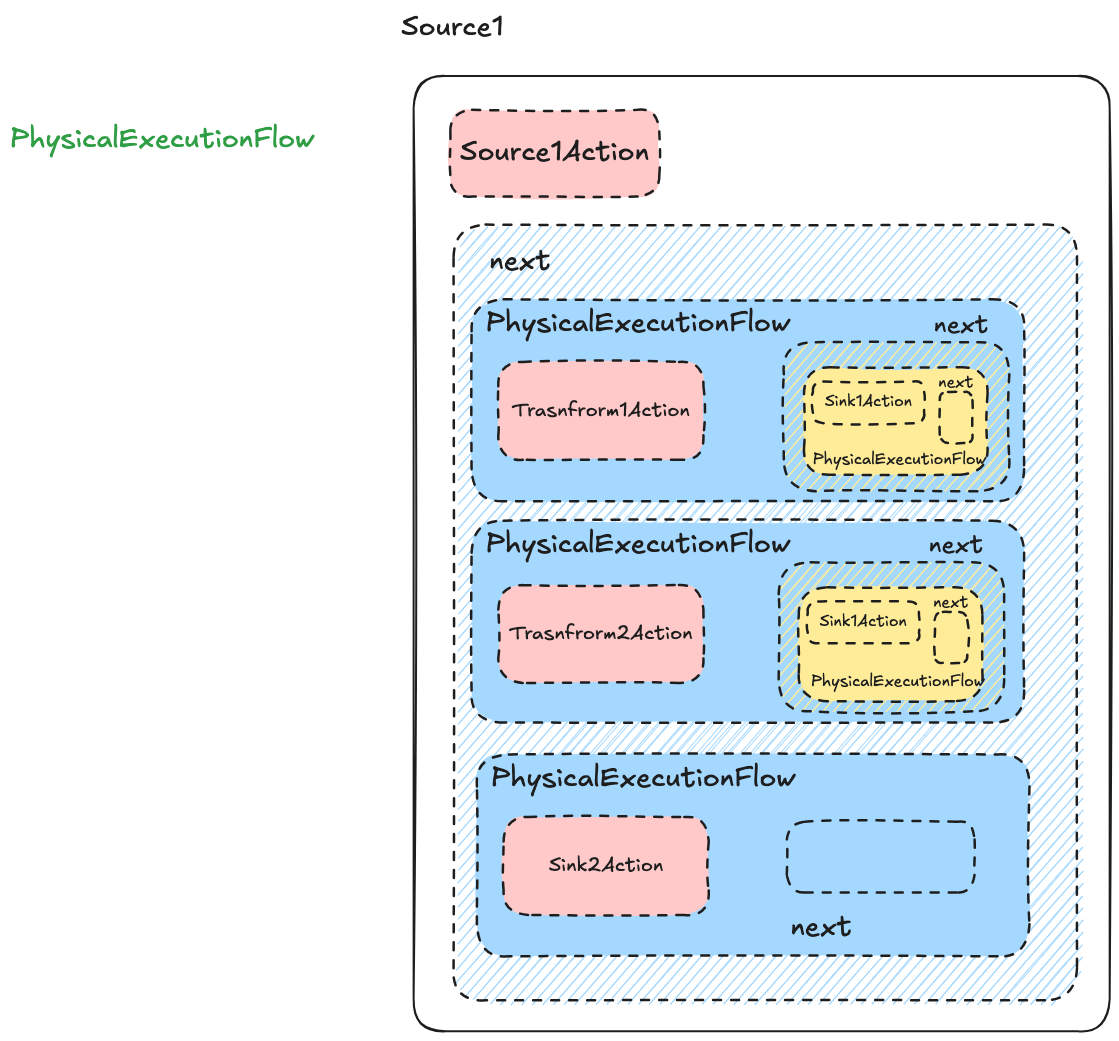
接下来会有一步, 判断是否有sink action, 如何存在则需要进行拆分splitSinkFromFlow, 而刚刚生成的Flow是带有sink action的, 经过splitSinkFromFlow会变成
 根据这个
根据这个source生成的PhysicalVertex为
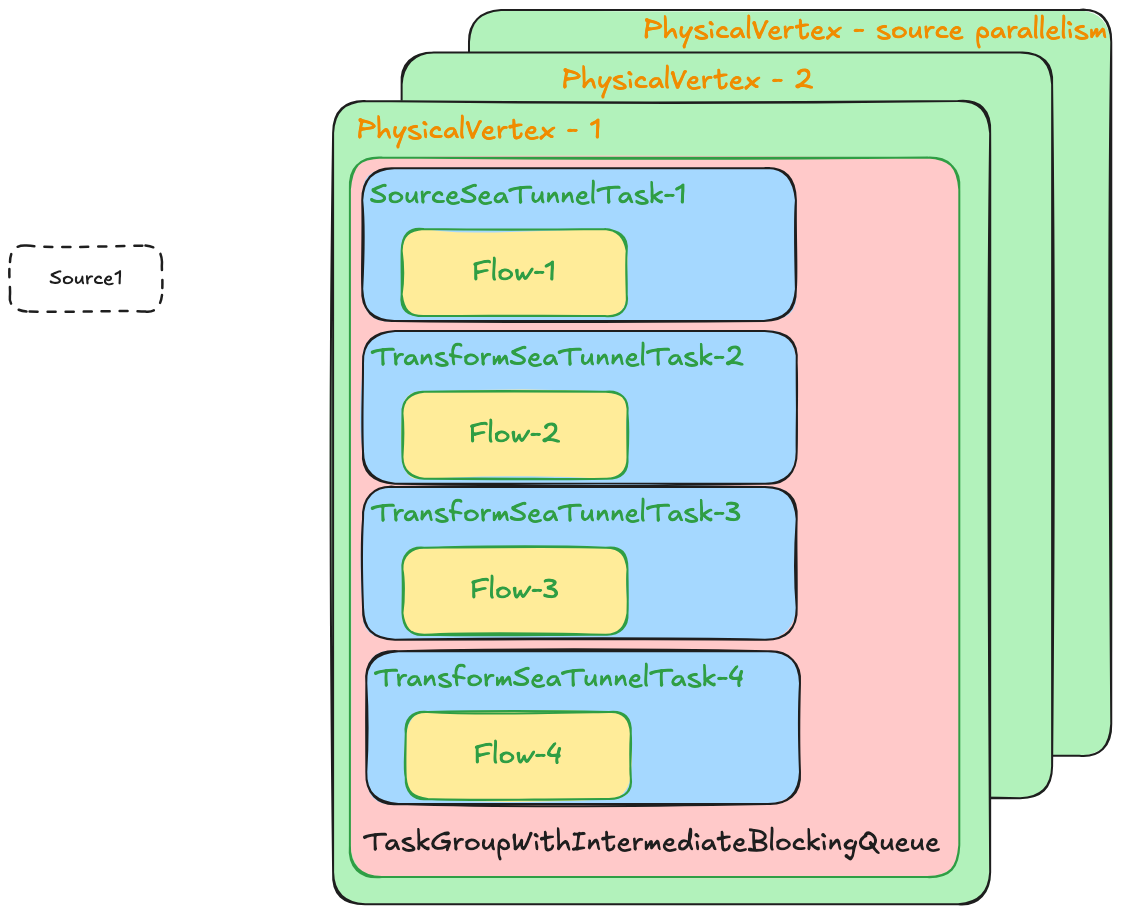
任务执行
在CoordinatorService中通过init方法生成了物理计划,然后会再调用run来真正的将任务运行起来。
 1
 2
 3
 4
 5
 6
 7
 8
 9
10
11
12
13
14
15
|
CoordinatorService {
    jobMaster.init(
            runningJobInfoIMap.get(jobId).getInitializationTimestamp(), false);
    ...
    jobMaster.run();

 }

 JobMaster {
    public void run() {
        ...
        physicalPlan.startJob();
        ...
    }
}
|
在JobMaster中启动任务,会调用PhysicalPlan的startJob方法
 1
 2
 3
 4
 5
 6
 7
 8
 9
10
11
12
13
14
15
16
17
18
19
20
21
22
23
24
25
26
27
28
29
30
31
32
33
34
35
36
37
38
39
40
41
42
43
44
45
|
public void startJob() {
    isRunning = true;
    log.info("{} state process is start", getJobFullName());
    stateProcess();
}

private synchronized void stateProcess() {
    if (!isRunning) {
        log.warn(String.format("%s state process is stopped", jobFullName));
        return;
    }
    switch (getJobStatus()) {
        case CREATED:
            updateJobState(JobStatus.SCHEDULED);
            break;
        case SCHEDULED:
            getPipelineList()
                    .forEach(
                            subPlan -> {
                                if (PipelineStatus.CREATED.equals(
                                        subPlan.getCurrPipelineStatus())) {
                                    subPlan.startSubPlanStateProcess();
                                }
                            });
            updateJobState(JobStatus.RUNNING);
            break;
        case RUNNING:
        case DOING_SAVEPOINT:
            break;
        case FAILING:
        case CANCELING:
            jobMaster.neverNeedRestore();
            getPipelineList().forEach(SubPlan::cancelPipeline);
            break;
        case FAILED:
        case CANCELED:
        case SAVEPOINT_DONE:
        case FINISHED:
            stopJobStateProcess();
            jobEndFuture.complete(new JobResult(getJobStatus(), errorBySubPlan.get()));
            return;
        default:
            throw new IllegalArgumentException("Unknown Job State: " + getJobStatus());
    }
}
|
在PhysicalPlan中,启动任务会将任务的状态更新为SCHEDULED状态,然后会继续调用SubPlan的启动方法。
 1
 2
 3
 4
 5
 6
 7
 8
 9
10
11
12
13
14
15
16
17
18
19
20
21
22
23
24
25
26
27
28
29
30
31
32
33
34
35
36
37
38
39
40
41
42
43
44
45
46
47
48
49
50
51
52
53
54
55
56
57
58
59
60
61
62
63
64
65
66
67
68
69
70
71
72
73
74
75
76
77
78
79
80
81
82
83
84
85
|
public void startSubPlanStateProcess() {
    isRunning = true;
    log.info("{} state process is start", getPipelineFullName());
    stateProcess();
}

private synchronized void stateProcess() {
    if (!isRunning) {
        log.warn(String.format("%s state process not start", pipelineFullName));
        return;
    }
    PipelineStatus state = getCurrPipelineStatus();
    switch (state) {
        case CREATED:
            updatePipelineState(PipelineStatus.SCHEDULED);
            break;
        case SCHEDULED:
            try {
                ResourceUtils.applyResourceForPipeline(jobMaster.getResourceManager(), this);
                log.debug(
                        "slotProfiles: {}, PipelineLocation: {}",
                        slotProfiles,
                        this.getPipelineLocation());
                updatePipelineState(PipelineStatus.DEPLOYING);
            } catch (Exception e) {
                makePipelineFailing(e);
            }
            break;
        case DEPLOYING:
            coordinatorVertexList.forEach(
                    task -> {
                        if (task.getExecutionState().equals(ExecutionState.CREATED)) {
                            task.startPhysicalVertex();
                            task.makeTaskGroupDeploy();
                        }
                    });

            physicalVertexList.forEach(
                    task -> {
                        if (task.getExecutionState().equals(ExecutionState.CREATED)) {
                            task.startPhysicalVertex();
                            task.makeTaskGroupDeploy();
                        }
                    });
            updatePipelineState(PipelineStatus.RUNNING);
            break;
        case RUNNING:
            break;
        case FAILING:
        case CANCELING:
            coordinatorVertexList.forEach(
                    task -> {
                        task.startPhysicalVertex();
                        task.cancel();
                    });

            physicalVertexList.forEach(
                    task -> {
                        task.startPhysicalVertex();
                        task.cancel();
                    });
            break;
        case FAILED:
        case CANCELED:
            if (checkNeedRestore(state) && prepareRestorePipeline()) {
                jobMaster.releasePipelineResource(this);
                restorePipeline();
                return;
            }
            subPlanDone(state);
            stopSubPlanStateProcess();
            pipelineFuture.complete(
                    new PipelineExecutionState(pipelineId, state, errorByPhysicalVertex.get()));
            return;
        case FINISHED:
            subPlanDone(state);
            stopSubPlanStateProcess();
            pipelineFuture.complete(
                    new PipelineExecutionState(
                            pipelineId, getPipelineState(), errorByPhysicalVertex.get()));
            return;
        default:
            throw new IllegalArgumentException("Unknown Pipeline State: " + getPipelineState());
    }
}
|
在SubPlan中,当状态为SCHEDULED时,会进行资源的申请,
 1
 2
 3
 4
 5
 6
 7
 8
 9
10
11
12
13
14
15
16
17
18
19
20
21
22
23
24
25
26
27
28
29
30
31
32
33
34
35
36
37
38
39
40
41
42
43
44
45
46
47
48
49
50
51
52
53
54
55
56
57
|
public static void applyResourceForPipeline(
        @NonNull ResourceManager resourceManager, @NonNull SubPlan subPlan) {
    Map<TaskGroupLocation, CompletableFuture<SlotProfile>> futures = new HashMap<>();
    Map<TaskGroupLocation, SlotProfile> slotProfiles = new HashMap<>();
    // TODO If there is no enough resources for tasks, we need add some wait profile
    subPlan.getCoordinatorVertexList()
            .forEach(
                    coordinator ->
                            futures.put(
                                    coordinator.getTaskGroupLocation(),
                                    applyResourceForTask(
                                            resourceManager, coordinator, subPlan.getTags())));

    subPlan.getPhysicalVertexList()
            .forEach(
                    task ->
                            futures.put(
                                    task.getTaskGroupLocation(),
                                    applyResourceForTask(
                                            resourceManager, task, subPlan.getTags())));

    futures.forEach(
            (key, value) -> {
                try {
                    slotProfiles.put(key, value == null ? null : value.join());
                } catch (CompletionException e) {
                    // do nothing
                }
            });
    // set it first, avoid can't get it when get resource not enough exception and need release
    // applied resource
    subPlan.getJobMaster().setOwnedSlotProfiles(subPlan.getPipelineLocation(), slotProfiles);
    if (futures.size() != slotProfiles.size()) {
        throw new NoEnoughResourceException();
    }
}

public static CompletableFuture<SlotProfile> applyResourceForTask(
        ResourceManager resourceManager, PhysicalVertex task, Map<String, String> tags) {
    // TODO custom resource size
    return resourceManager.applyResource(
            task.getTaskGroupLocation().getJobId(), new ResourceProfile(), tags);
}


public CompletableFuture<List<SlotProfile>> applyResources(
        long jobId, List<ResourceProfile> resourceProfile, Map<String, String> tagFilter)
        throws NoEnoughResourceException {
    waitingWorkerRegister();
    ConcurrentMap<Address, WorkerProfile> matchedWorker = filterWorkerByTag(tagFilter);
    if (matchedWorker.isEmpty()) {
        log.error("No matched worker with tag filter {}.", tagFilter);
        throw new NoEnoughResourceException();
    }
    return new ResourceRequestHandler(jobId, resourceProfile, matchedWorker, this)
            .request(tagFilter);
}
|
在一个SubPlan中会将所有的任务进行资源的申请,申请资源是通过ResourceManager进行的。申请时首先会按照用户任务中设置的tag来选择将要运行任务的节点,这样就可以将任务运行在我们指定的节点上,达到资源隔离的目的。
 1
 2
 3
 4
 5
 6
 7
 8
 9
10
11
12
13
14
15
16
17
18
19
20
21
22
23
24
25
26
27
28
29
30
31
32
33
34
35
36
37
38
39
40
41
42
43
44
45
46
|
public Optional<WorkerProfile> preCheckWorkerResource(ResourceProfile r) {
    // Shuffle the order to ensure random selection of workers
    List<WorkerProfile> workerProfiles =
            Arrays.asList(registerWorker.values().toArray(new WorkerProfile[0]));
    Collections.shuffle(workerProfiles);
    // Check if there are still unassigned slots
    Optional<WorkerProfile> workerProfile =
            workerProfiles.stream()
                    .filter(
                            worker ->
                                    Arrays.stream(worker.getUnassignedSlots())
                                            .anyMatch(
                                                    slot ->
                                                            slot.getResourceProfile()
                                                                    .enoughThan(r)))
                    .findAny();

    if (!workerProfile.isPresent()) {
        // Check if there are still unassigned resources
        workerProfile =
                workerProfiles.stream()
                        .filter(WorkerProfile::isDynamicSlot)
                        .filter(worker -> worker.getUnassignedResource().enoughThan(r))
                        .findAny();
    }

    return workerProfile;
}

private CompletableFuture<SlotAndWorkerProfile> singleResourceRequestToMember(
        int i, ResourceProfile r, WorkerProfile workerProfile) {
    CompletableFuture<SlotAndWorkerProfile> future =
            resourceManager.sendToMember(
                    new RequestSlotOperation(jobId, r), workerProfile.getAddress());
    return future.whenComplete(
            withTryCatch(
                    LOGGER,
                    (slotAndWorkerProfile, error) -> {
                        if (error != null) {
                            throw new RuntimeException(error);
                        } else {
                            resourceManager.heartbeat(slotAndWorkerProfile.getWorkerProfile());
                            addSlotToCacheMap(i, slotAndWorkerProfile.getSlotProfile());
                        }
                    }));
}
|
当拿到全部可用节点后,会将节点先打乱,然后再随机查找一个可用资源比所需资源大的节点,随即与该节点通信,发送RequestSlotOperation给该节点
 1
 2
 3
 4
 5
 6
 7
 8
 9
10
11
12
13
14
15
16
17
18
19
20
21
22
|
@Override
public synchronized SlotAndWorkerProfile requestSlot(
        long jobId, ResourceProfile resourceProfile) {
    initStatus = false;
    SlotProfile profile = selectBestMatchSlot(resourceProfile);
    if (profile != null) {
        profile.assign(jobId);
        assignedResource.accumulateAndGet(profile.getResourceProfile(), ResourceProfile::merge);
        unassignedResource.accumulateAndGet(
                profile.getResourceProfile(), ResourceProfile::subtract);
        unassignedSlots.remove(profile.getSlotID());
        assignedSlots.put(profile.getSlotID(), profile);
        contexts.computeIfAbsent(
                profile.getSlotID(),
                p -> new SlotContext(profile.getSlotID(), taskExecutionService));
    }
    LOGGER.fine(
            String.format(
                    "received slot request, jobID: %d, resource profile: %s, return: %s",
                    jobId, resourceProfile, profile));
    return new SlotAndWorkerProfile(getWorkerProfile(), profile);
}
|
该节点的SlotService中接收到requestSlot请求后,会将自身信息进行更新,然后返回给master节点信息。
在请求资源的过程中,如果最终请求的资源没有达到预期结果,会得到NoEnoughResourceException异常,任务运行失败。
当资源请求成功后,会开始进行任务的部署,task.makeTaskGroupDeploy()将任务发送到worker节点上来运行任务
 1
 2
 3
 4
 5
 6
 7
 8
 9
10
11
12
13
14
15
16
17
18
19
20
21
22
23
24
25
26
27
28
29
30
31
32
33
34
35
36
37
38
39
40
41
42
43
44
45
46
47
|
TaskDeployState deployState =
        deploy(jobMaster.getOwnedSlotProfiles(taskGroupLocation));


public TaskDeployState deploy(@NonNull SlotProfile slotProfile) {
    try {
        if (slotProfile.getWorker().equals(nodeEngine.getThisAddress())) {
            return deployOnLocal(slotProfile);
        } else {
            return deployOnRemote(slotProfile);
        }
    } catch (Throwable th) {
        return TaskDeployState.failed(th);
    }
}


private TaskDeployState deployOnRemote(@NonNull SlotProfile slotProfile) {
    return deployInternal(
            taskGroupImmutableInformation -> {
                try {
                    return (TaskDeployState)
                            NodeEngineUtil.sendOperationToMemberNode(
                                            nodeEngine,
                                            new DeployTaskOperation(
                                                    slotProfile,
                                                    nodeEngine
                                                            .getSerializationService()
                                                            .toData(
                                                                    taskGroupImmutableInformation)),
                                            slotProfile.getWorker())
                                    .get();
                } catch (Exception e) {
                    if (getExecutionState().isEndState()) {
                        log.warn(ExceptionUtils.getMessage(e));
                        log.warn(
                                String.format(
                                        "%s deploy error, but the state is already in end state %s, skip this error",
                                        getTaskFullName(), currExecutionState));
                        return TaskDeployState.success();
                    } else {
                        return TaskDeployState.failed(e);
                    }
                }
            });
}
|
部署任务时,会将任务信息发送到刚刚在资源分配时获取到的节点上
 1
 2
 3
 4
 5
 6
 7
 8
 9
10
11
12
13
14
15
16
17
18
19
20
21
22
23
24
25
26
27
28
29
30
31
32
33
34
35
36
37
38
39
40
41
42
43
44
45
46
47
48
49
50
51
52
53
54
55
56
57
58
59
60
61
62
63
64
65
66
67
|
public TaskDeployState deployTask(@NonNull Data taskImmutableInformation) {
    TaskGroupImmutableInformation taskImmutableInfo =
            nodeEngine.getSerializationService().toObject(taskImmutableInformation);
    return deployTask(taskImmutableInfo);
}

public TaskDeployState deployTask(@NonNull TaskGroupImmutableInformation taskImmutableInfo) {
    logger.info(
            String.format(
                    "received deploying task executionId [%s]",
                    taskImmutableInfo.getExecutionId()));
    TaskGroup taskGroup = null;
    try {
        Set<ConnectorJarIdentifier> connectorJarIdentifiers =
                taskImmutableInfo.getConnectorJarIdentifiers();
        Set<URL> jars = new HashSet<>();
        ClassLoader classLoader;
        if (!CollectionUtils.isEmpty(connectorJarIdentifiers)) {
            // Prioritize obtaining the jar package file required for the current task execution
            // from the local, if it does not exist locally, it will be downloaded from the
            // master node.
            jars =
                    serverConnectorPackageClient.getConnectorJarFromLocal(
                            connectorJarIdentifiers);
        } else if (!CollectionUtils.isEmpty(taskImmutableInfo.getJars())) {
            jars = taskImmutableInfo.getJars();
        }
        classLoader =
                classLoaderService.getClassLoader(
                        taskImmutableInfo.getJobId(), Lists.newArrayList(jars));
        if (jars.isEmpty()) {
            taskGroup =
                    nodeEngine.getSerializationService().toObject(taskImmutableInfo.getGroup());
        } else {
            taskGroup =
                    CustomClassLoadedObject.deserializeWithCustomClassLoader(
                            nodeEngine.getSerializationService(),
                            classLoader,
                            taskImmutableInfo.getGroup());
        }

        logger.info(
                String.format(
                        "deploying task %s, executionId [%s]",
                        taskGroup.getTaskGroupLocation(), taskImmutableInfo.getExecutionId()));

        synchronized (this) {
            if (executionContexts.containsKey(taskGroup.getTaskGroupLocation())) {
                throw new RuntimeException(
                        String.format(
                                "TaskGroupLocation: %s already exists",
                                taskGroup.getTaskGroupLocation()));
            }
            deployLocalTask(taskGroup, classLoader, jars);
            return TaskDeployState.success();
        }
    } catch (Throwable t) {
        logger.severe(
                String.format(
                        "TaskGroupID : %s  deploy error with Exception: %s",
                        taskGroup != null && taskGroup.getTaskGroupLocation() != null
                                ? taskGroup.getTaskGroupLocation().toString()
                                : "taskGroupLocation is null",
                        ExceptionUtils.getMessage(t)));
        return TaskDeployState.failed(t);
    }
}
|
当worker节点接收到任务后,会调用TaskExecutionService的deployTask方法将任务提交到启动时创建的线程池中。
当任务提交到线程池中
 1
 2
 3
 4
 5
 6
 7
 8
 9
10
11
12
13
14
15
16
17
18
19
20
21
22
23
24
25
26
27
28
29
30
31
32
33
|
private final class BlockingWorker implements Runnable {

    private final TaskTracker tracker;
    private final CountDownLatch startedLatch;

    private BlockingWorker(TaskTracker tracker, CountDownLatch startedLatch) {
        this.tracker = tracker;
        this.startedLatch = startedLatch;
    }

    @Override
    public void run() {
        TaskExecutionService.TaskGroupExecutionTracker taskGroupExecutionTracker =
                tracker.taskGroupExecutionTracker;
        ClassLoader classLoader =
                executionContexts
                        .get(taskGroupExecutionTracker.taskGroup.getTaskGroupLocation())
                        .getClassLoader();
        ClassLoader oldClassLoader = Thread.currentThread().getContextClassLoader();
        Thread.currentThread().setContextClassLoader(classLoader);
        final Task t = tracker.task;
        ProgressState result = null;
        try {
            startedLatch.countDown();
            t.init();
            do {
                result = t.call();
            } while (!result.isDone()
                    && isRunning
                    && !taskGroupExecutionTracker.executionCompletedExceptionally());
        ...
    }
}
|
会调用Task.call 方法,从而数据同步的任务会真正的被调用起来。
ClassLoader
在SeaTunnel中,修改了默认的ClassLoader的类,修改为子类优先,从而避免了与其他组件类冲突的问题
 1
 2
 3
 4
 5
 6
 7
 8
 9
10
11
12
13
14
15
16
17
18
19
20
21
22
23
24
|
@Override
public synchronized ClassLoader getClassLoader(long jobId, Collection<URL> jars) {
    log.debug("Get classloader for job {} with jars {}", jobId, jars);
    if (cacheMode) {
        // with cache mode, all jobs share the same classloader if the jars are the same
        jobId = 1L;
    }
    if (!classLoaderCache.containsKey(jobId)) {
        classLoaderCache.put(jobId, new ConcurrentHashMap<>());
        classLoaderReferenceCount.put(jobId, new ConcurrentHashMap<>());
    }
    Map<String, ClassLoader> classLoaderMap = classLoaderCache.get(jobId);
    String key = covertJarsToKey(jars);
    if (classLoaderMap.containsKey(key)) {
        classLoaderReferenceCount.get(jobId).get(key).incrementAndGet();
        return classLoaderMap.get(key);
    } else {
        ClassLoader classLoader = new SeaTunnelChildFirstClassLoader(jars);
        log.info("Create classloader for job {} with jars {}", jobId, jars);
        classLoaderMap.put(key, classLoader);
        classLoaderReferenceCount.get(jobId).put(key, new AtomicInteger(1));
        return classLoader;
    }
}
|
RestAPI任务提交
SeaTunnel也支持RestAPI的提交方式,当需要此功能时,首先需要在hazelcast.yaml文件中添加这样一段配置
1
2
3
4
5
6
7
8
|
network:
    rest-api:
      enabled: true
      endpoint-groups:
        CLUSTER_WRITE:
          enabled: true
        DATA:
          enabled: true
|
当添加这样一段配置后,hazelcast节点启动后就可以接收http请求了
我们同样以提交任务为例,看下执行流程。
当我们使用RestAPI来提交任务时,客户端的就变成了我们发送http请求的节点,服务端就是seatunnel集群。
当服务端接收到请求后,会根据请求的链接,调用相应的方法
 1
 2
 3
 4
 5
 6
 7
 8
 9
10
11
12
13
14
15
16
17
18
19
20
21
|
public void handle(HttpPostCommand httpPostCommand) {
    String uri = httpPostCommand.getURI();
    try {
        if (uri.startsWith(SUBMIT_JOB_URL)) {
            handleSubmitJob(httpPostCommand, uri);
        } else if (uri.startsWith(STOP_JOB_URL)) {
            handleStopJob(httpPostCommand, uri);
        } else if (uri.startsWith(ENCRYPT_CONFIG)) {
            handleEncrypt(httpPostCommand);
        } else {
            original.handle(httpPostCommand);
        }
    } catch (IllegalArgumentException e) {
        prepareResponse(SC_400, httpPostCommand, exceptionResponse(e));
    } catch (Throwable e) {
        logger.warning("An error occurred while handling request " + httpPostCommand, e);
        prepareResponse(SC_500, httpPostCommand, exceptionResponse(e));
    }

    this.textCommandService.sendResponse(httpPostCommand);
}
|
会根据路径来查找相应的方法
 1
 2
 3
 4
 5
 6
 7
 8
 9
10
11
12
13
14
15
16
17
18
19
20
21
22
23
24
25
26
27
28
29
30
31
32
33
34
35
36
37
38
39
40
41
42
43
44
45
46
47
48
49
|
private void handleSubmitJob(HttpPostCommand httpPostCommand, String uri)
        throws IllegalArgumentException {
    Map<String, String> requestParams = new HashMap<>();
    RestUtil.buildRequestParams(requestParams, uri);
    Config config = RestUtil.buildConfig(requestHandle(httpPostCommand), false);
    ReadonlyConfig envOptions = ReadonlyConfig.fromConfig(config.getConfig("env"));
    String jobName = envOptions.get(EnvCommonOptions.JOB_NAME);

    JobConfig jobConfig = new JobConfig();
    jobConfig.setName(
            StringUtils.isEmpty(requestParams.get(RestConstant.JOB_NAME))
                    ? jobName
                    : requestParams.get(RestConstant.JOB_NAME));

    boolean startWithSavePoint =
            Boolean.parseBoolean(requestParams.get(RestConstant.IS_START_WITH_SAVE_POINT));
    String jobIdStr = requestParams.get(RestConstant.JOB_ID);
    Long finalJobId = StringUtils.isNotBlank(jobIdStr) ? Long.parseLong(jobIdStr) : null;
    SeaTunnelServer seaTunnelServer = getSeaTunnelServer();
    RestJobExecutionEnvironment restJobExecutionEnvironment =
            new RestJobExecutionEnvironment(
                    seaTunnelServer,
                    jobConfig,
                    config,
                    textCommandService.getNode(),
                    startWithSavePoint,
                    finalJobId);
    JobImmutableInformation jobImmutableInformation = restJobExecutionEnvironment.build();
    long jobId = jobImmutableInformation.getJobId();
    if (!seaTunnelServer.isMasterNode()) {

        NodeEngineUtil.sendOperationToMasterNode(
                        getNode().nodeEngine,
                        new SubmitJobOperation(
                                jobId,
                                getNode().nodeEngine.toData(jobImmutableInformation),
                                jobImmutableInformation.isStartWithSavePoint()))
                .join();

    } else {
        submitJob(seaTunnelServer, jobImmutableInformation, jobConfig);
    }

    this.prepareResponse(
            httpPostCommand,
            new JsonObject()
                    .add(RestConstant.JOB_ID, String.valueOf(jobId))
                    .add(RestConstant.JOB_NAME, jobConfig.getName()));
}
|
这里的逻辑与客户端差不多,由于没有local模式,那么就不需要去创建本地服务了。
在客户端我们会通过ClientJobExecutionEnvironment这个类来进行逻辑计划解析等操作,同样这样也有一个RestJobExecutionEnvironment来做同样的事情。
最终提交任务时,如果当前节点非master节点,那么就会向master节点发送信息,master节点接收到信息后与从命令行客户端接收信息的处理逻辑就一致了。
如果当前节点是master节点,会直接调用submitJob方法,这里直接调用了coordinatorService.submitJob方法进行后续的处理。
 1
 2
 3
 4
 5
 6
 7
 8
 9
10
11
12
13
14
15
16
17
18
|
private void submitJob(
        SeaTunnelServer seaTunnelServer,
        JobImmutableInformation jobImmutableInformation,
        JobConfig jobConfig) {
    CoordinatorService coordinatorService = seaTunnelServer.getCoordinatorService();
    Data data =
            textCommandService
                    .getNode()
                    .nodeEngine
                    .getSerializationService()
                    .toData(jobImmutableInformation);
    PassiveCompletableFuture<Void> voidPassiveCompletableFuture =
            coordinatorService.submitJob(
                    Long.parseLong(jobConfig.getJobContext().getJobId()),
                    data,
                    jobImmutableInformation.isStartWithSavePoint());
    voidPassiveCompletableFuture.join();
}
|
可以看出,两种提交方式,都是会在提交任务的一端做逻辑计划解析,然后将信息发送给master节点,再由master节点做任务的物理计划解析,分配等操作。